Section 1
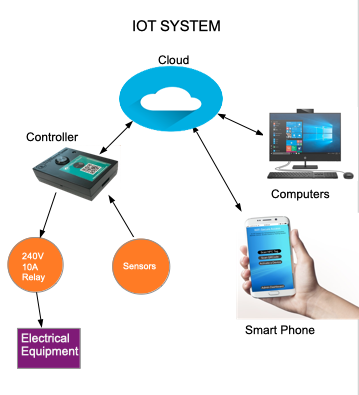
An introduction to IOT system. With a block diagram,
the course will go through the
various elements of an IOT system that includes
a hardware (IOT device), a central server
(usually
cloud server) and a user interface (usually some
apps such as Google Home or Alexa) on a smart
phone. An introduction to the workflow of the lessons in the course
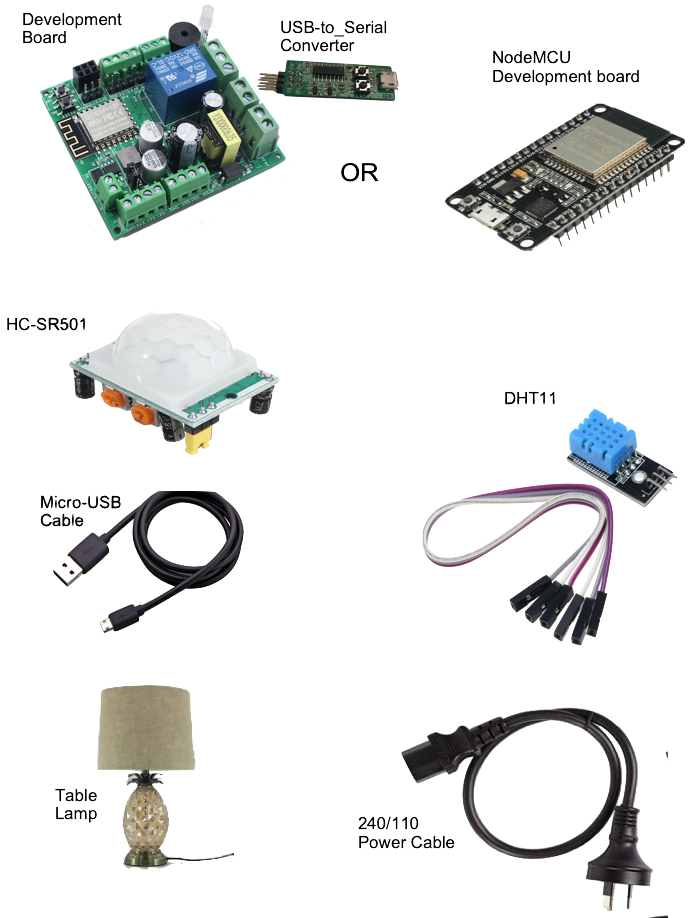
as well as the components/equipment required to complete this
course will be discussed
Section 2
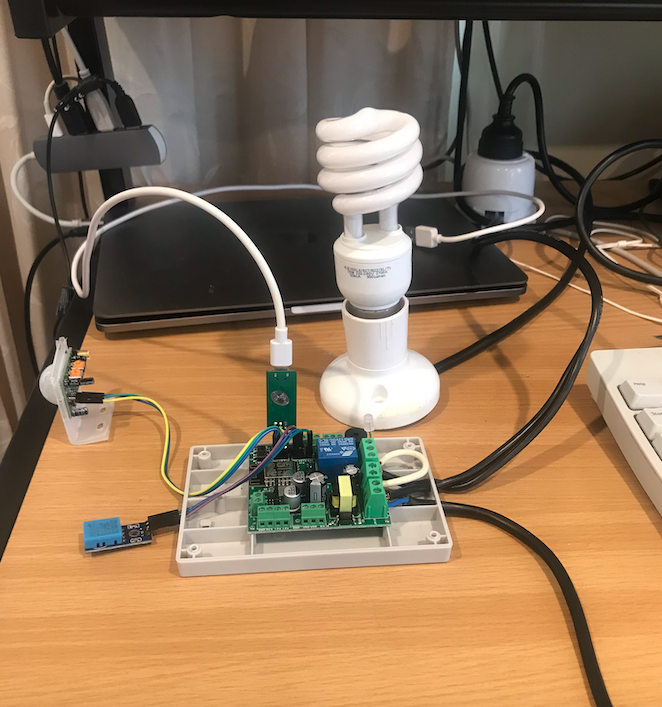
Design the hardware of a simple IOT device. The
design will be based on an ESP8266
microcontroller. The participants will design the
schematic of the hardware to connect external
appliances such as electric lights, fans,
solenoids and so on. The design will also have
provisions to
connect sensors. The participants can fabricate this design, if they want to.
However, as a pre-fabricated board with this design
is available from wifisecureaccess, the participants can buy that pre-fabricated board
and use it in this course.
This General purpose IOT development board is listed in
the
“requirements” section of this course. At the end of this section, the participants
would acquire the skills and knowledge to modify or improve this design or to design a new board
to incorporate any of their special needs. They can, then get the board fabricated
by manufacturers.
Section 3
Programming the designed IOT device using Arduino
IDE. The participants will learn how
to write programs (firmware) for this IOT device
using Arduino IDE. Arduino IDE is a popular
software package freely available to download.
The participants will be taken through the
process
of installing the IDE, configuring it and
compiling and loading a program to the IOT
device. The
participants will be given a simple program that
they can compile and load to the IOT device.
This
program will help put on/off a port of the IOT
device. During the session, the participants will be supplied with a modified program
that can read sensors such as motion and
temperature/humidity. The instructor will go through
each line of this code to help you understand how
data is read from sensors and how output ports
such as relays and solid state switch are put ON/OFF
Section 4
In this section, the participants will learn about
building a cloud server. A cloud server is an essential
component of an IOT system.
The participants will be required to open an
account with Google, or Amazon Web services, or
Digital Ocean and create a cloud server. All
these companies give free cloud server for one
year
(usually). So, it does not cost anything to use
this in this course. In the lessons, the instructor will
step through the process of getting a cloud server
and installing a Linux Operating System. Python programming
will also be introduced in the lessons.
Section 5
In this section, the participants will learn about
MQTT. They will learn installing an MQTT broker on their cloud server.
They will learn the publish/subscriber model of MQTT.
Then, they will develop sample programs for publish and subscribe
and test them on their cloud server. Sample programs will be provided and
the instructor will go through the details.
section 6
In this section, the participants will develop a publisih/subscribe program
in python to run on their cloud server to communicate with their device.
The arduino program developed in section 3 will be modified to communicate with the publish/subscribe
program on the cloud server. Sample programs will be provided and the instructor will go through
the details of the sample programs. A subscriber program will also be developed to send an email when motion is detected by motion sensor.
At the end of this section, the participants will have the needed
programs to communicate between the cloud server and the device.
Section 7
In this section, the participants will learn to register a domain name and associate
that domain name with their cloud server.
They can register with godaddy.com or with any other company as they choose.
For the purpose of this course, the domain name can be any name. The names such as
my_course2021.xyz will cost only USD1.30 per year.
If the participants are interested in getting a meaningful domain name
for themselves, they can do so by paying a higher subscription fee.
It can take 24 hours or so for your domain name to get propagated through domain servers.
After registering, the arduino program that was developed in section 6 will be modified
to use domain name instead of ip address.
Section 8
In this section, the participants will install
a Django web server on the cloud server. Django is a free web
application package available to download.
After installing Django on their cloud server, they will write
simple programs in python to display a message on a browser.
They will test and verify that a message is displayed on the browser when
their domain name is given in the address bar of the browser.
Section 9
The participants will then write simple programs in python
for communication between web server and the MQTT broker.
Sample programs will be provided. The instructor will go
through the details of the sample programs.
At the end of this section, the participant will be able to
activate a port of their device by clicking a button on a web browser.
They will also be able
to read and display the values from the sensors connected to the device.
Section 10
In this section, the participants will learn about the need for
encryption of data transfer
as well as the need for using https instead of http on their web server.
The participants will
install an SSL certificate from Let'sEncrypt so
that https can be used instead of http. This SSL certificate is
free from Let'sEncrypt.
The instructor will take the participants through the steps involved
in installing all the above. At the end of this section,
the participants will have a secure webserver running on
their cloud server ithat can be accessed from a browser using https
Section 11
Once they have completed section 10 and have installed Let'sEncrypt certificate,
The participants will learn using secure connection between MQTT broker and
their device.
The arduino program developed in earlier sectinss will be modified to use
server's certificate for secure data transfer.
At the completion of this section, they will have an IOT system
that is secure. Data transfer between their device and MQTT broker will be encrypted and secure.
The participants will test and confirm once again that they are
able to activate a port on their device
by pressing a button on a browser from any computer.
Section 12
The students will next learn about interfacing the web server with Google action console/server
so that this IOT device can be activated using Google Home. They
will open an account with Google Actions and
create a project on Google Action Console and
set
the endpoints for account linking and
fullfillment. Then, they will write the needed
programs on their web server for account linking,
token exchanges. Sample programs will be provided.
The instructir will go through the details of the program.
They will, then test and confirm that the account linking
between their web server and GoogleHome server works well.
Section 13
In this section, the participants will develop programs to
execute the fullfilment requests coming from GoogleHome server.
They will develop simple programs for syncing device ports with
GoogleHome server. They will also develop programs for QUERRY and EXECUTE
requests from GoogleHome.
Sample programs will be provided and the instructor
will go through the details of the sample programs.
Once the above steps are completed, the participants will be able
to add their IOT device to the Google Home on their smartphone,
and test and see if they are able to turn ON/OFF any port of their IOT
device through voice command on their Google Home.
At the completion of this section, the participants would have
acquired sufficient knowledge and skills to improve
upon these sample programs to suit their special needs
and requirements.
Section 14
Any student who has completed sections 1 through 13
successfully, by now should have a basic IOT system ready
to go. They can now
activate a port of the IOT device with voice
command from the smart phone.
Finally, in this section, the instructor will demonstrate a fully
developed IOT system that can run on their smart device.
The participants
will be given a fully developed firmware
from WiFisecureAccess that they can load on
their IOT device. If they load this firmware,
the
IOT device gets connected to
wifisecureaccess server with all the
required modules and interfaces of an IOT
system. This demonstration will help them
understand the various features that they can add on to their IOT system
to make it more versatile and marketable.
They can use the firmware from wifisecureaccess on their IOT device, if they want to,
or, improve
the sample programs to make it meet their
special needs and requirements. This is a choice
the
participants can make after the completion of
the course. Either way, at the completion of this course,
they would have acquired sufficient knowledge and skills
to design and develop an IOT system on their own.