Entry Control, Allowing Multiple Users (Groups Admin)
This document explains how multiple users can be allowed to use a device. The owner is allowed to use all his devices all the time regardless of the settings described in this section. This section explains how the owner can allow others to use his devices and how to control and manage their authorization.
1 Allowing Others to Use Your Devices
You can allow or authorize the others to use your smart device. To allow someone else to use your device, they have to be registered with wifisecureaccess.com. So, request the other user to register with wifisucureaccess.com. To register, either download the app and open the app and press Admin Dashboard, or go to https://wifisecureaccess.com and click on dashboard in the top navigation bar. When it requests you to login, click on 'Create a New account'
Once they are registered, you add their email address to the Allowed Users group of your device as per the steps below:
First create a Device Group. This can be done by clicking 'Devices groups' under 'Device Groups' in the Dashboard menu.
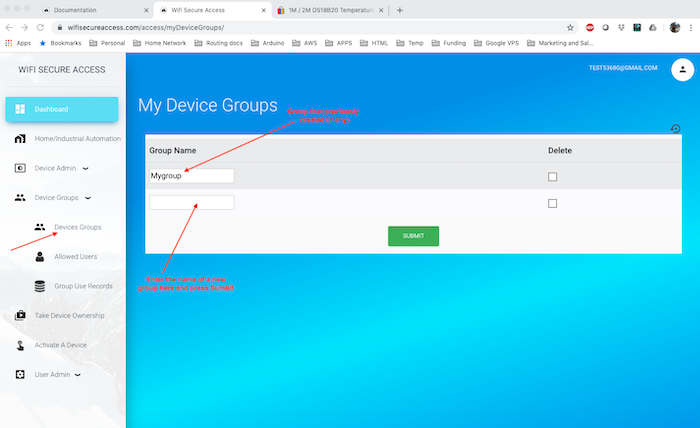
This page will display all the device groups that you have created so far. To add a new device group, just enter the name of the group in the bottom empty row and press submit. Make sure that the name that you entered is a new name. You can create as many groups as you need.
Next, click on 'Allowed Users' under Device Groups in the Dashboard menu. If you have created multiple groups, you may be prompted to select a group. You will then see a page similar to the one shown in Fig 131.
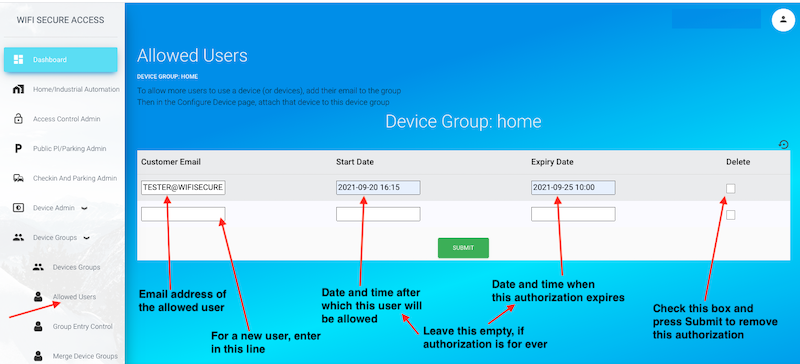
In this form, enter the email address of the one whom you want to allow to use your device, and press Submit. If you have several users whom you want to allow, enter the email addresses of all of them, one at a time. You have now created a group of users.
PS. If you want to allow everyone, you can enter an email address *@gmail.com. If this email address is in any device group, everyone can
activate that device to which this group is associated by scanning either its QRCode, or NFC Tag, but not by using voice prompt through Google Home or Alexa. This wildcard email address will not work when this group is associated with a device in parking lots or public places.
Note: When you added the email address of a user in a group, you could add a start date and an expiry date as well, if you want. Start date is the date and time this user will be allowed. He will not be allowed before that date and time. Once an expiry date is added, that user will not be allowed after that expiry date. The format of these dates is yyyy-mm-dd hh:mm. Leave these date blank if the user is allowed all the time with no start date and no expiry date.
You can also remove any user from this group at any time by checking the delete box against that user's name and pressing Submit.
PS: In the latest version, you may find an additional column named "Permissions" in the above form. Leave that blank. That is a field used for special purposes when we install this ourselves for large installations.
Next, you need to associate this group to your device so that all users in this group are allowed to use a device. To do that, click on 'Configure Device' under Device Admin in the Dashboard menu.
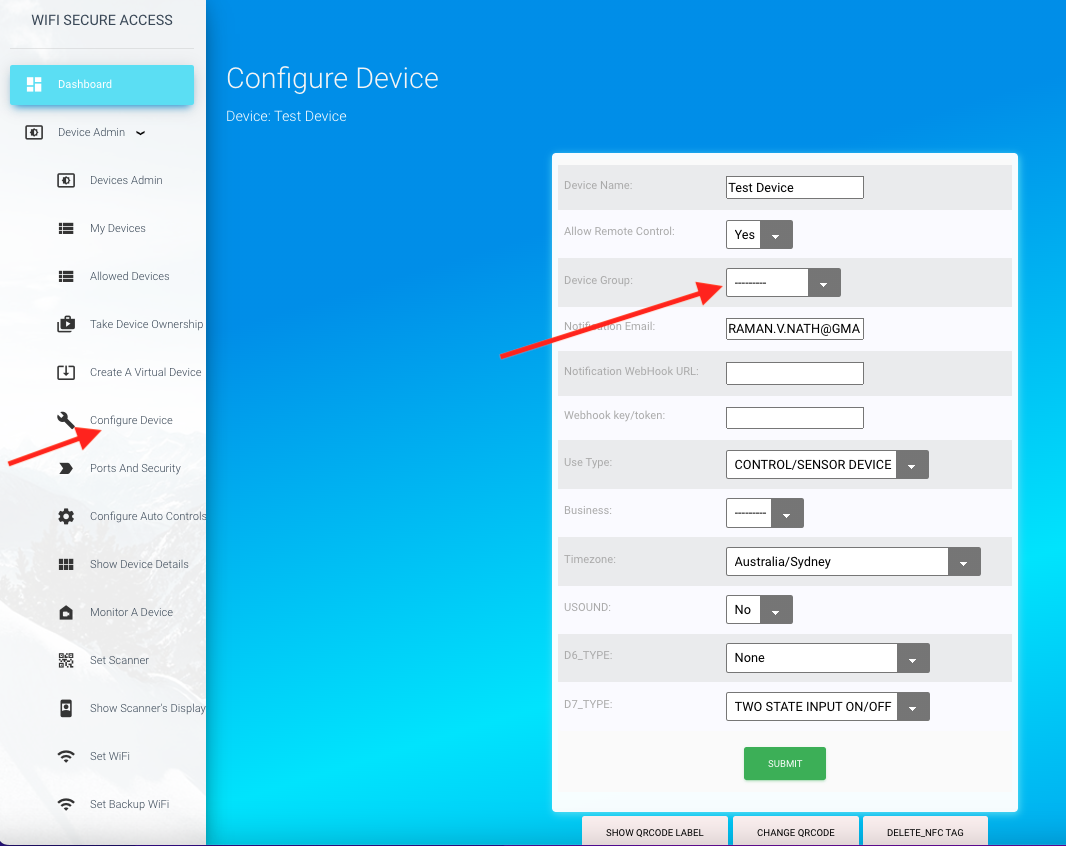
In this page, select your device group, and press Submit. If all the above configurations are successful, all users in the selected device group are allowed to use this device.
When a someone is allowed to use your device, they will see this device in the list of devices they can use. Also, when they click on 'Show Device details', this allowed device will show up. If this device's port is enabled for GoogleHome or Alexa, the allowed users will show this device in GoogleHome or Alexa when they discover wifisecureaccess devices. But, keep in mind that the allowed users cannot change the configuration of a device.
So, if you install this device at an access door to open or close a door, all allowed users will be able to open and close that door. If you have set a start date, that user will not be able to open the door before that date. If you have set an expiry date, they will not be able to open or close this door after that expiry date. In later sections of this documentation, you will learn how to install this device as an access controller of a door.
2 Configuring Group Entry Controls
It is possible to create entry controls on the members of a device group. For example, if you want to allow the members of a group only between some specific time of a day, you can set the opening and closing times for a group. To do that, click on 'Group entry Control' under Device Groups. This tab will be available only if you have created a group. If you have created multiple groups, you will be prompted to select a group. Once selected, you will see a page similar to Fig 133.
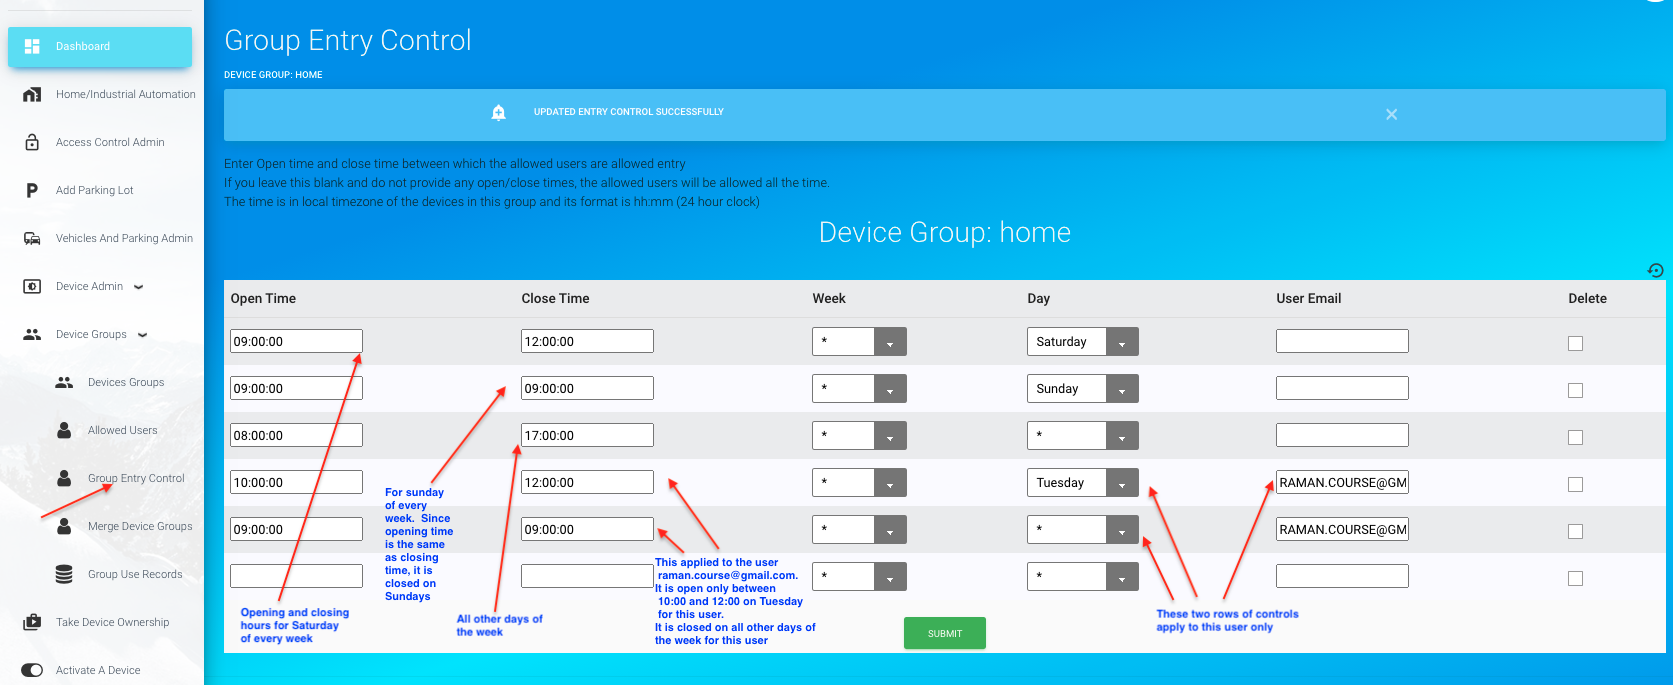
On this page, set Opening time and closing time for this group. In the field 'Week' and 'Day', you have multiple options. If you set * for week, it applies this opening and closing times for all weeks of the year. Or, you can select a week that you want this applied to. Week is the Gregarian week number. If you do not know the week number corresponding to any date, just enter the date in the YYY-MM-DD format. It will find its corresponding week number. If you enter a week number, this rule applies to that week only. Similarly, if you select * for Day, it will apply this to all days of a week. If you want this to apply to a particular day only, then select that day. You can also select the email address of a user this control must apply to. Then press submit.
Note: The general rule is that a member of the group is always allowed unless there is an open/close time in this table showing that the group is closed for him/her at that time of the day, on that day of the week of that year. An entry with opening time the same as closing time will mean no entry on that day of that week.
If no rows of controls is present, all users of this group will be allowed all the time, meaning that it is open all day, every week of the year. You can create a special closing and opening hours for a particular user by adding his email address in the 'User Email' field. If no user email is given, that opening and closing hours are applicable to everyone in that group. If opening and closing hours are missing for a user for any day of the week, the rule applicable to all will be used for that user.
You can add as many rows for each user as you want so long as those controls are different from each other. In other words, you can create an opening and closing hours for a user on Monday, another one for Tuesday and another one for, say, Thursday. And, if you leave all other days without specifying any control for that user, the general opening and closing hours used for all members of the group will be applied to this user.
You can also create multiple opening and closing hours within a day
Shown in Fig 133 is an example. In that, the first row is the opening and closing times for everybody on Saturday. The second row is the opening and closing times for everybody on Sunday. And, as the opening and closing time are the same on Sunday, it is effectively closed on Sunday. The third row is the opening and closing time for everyone on all other days of the week. The fourth and fifth rows apply to the user whose email address is given in the 'User Email' field. As per the fourth row, this user will be allowed between 10:00 and 12:00 on Tuesday, even though, all the others are allowed between 8:00 and 17:00 on Tuesdays(as per the third row). And, again, the fifth row specifically says that this user will not be allowed on any other days of the week. So, as special opening and closing times are given for a particular user covering every day of every week of the year, that rule will be applied to that user, and not the general rule. However, if a rule is not specified for a user for any day, the general rule will be applied to him for those days.
If there are no rows present, or if there is only one row with * for week and * for day, with user email empty, that means that it is open all days of the week and all weeks of the year for all the users in that group. In addition to this, you can create special opening/closing hours for each and everyone in the group. They can be either the same or different for each user.
If you do not want to anyone to enter, create a control with opening and closing hours the same. If you want to allow anyone, say, between 10:00 and 12:00 on Wednesday and do not want to grant any access on any other day, create two rows of control. In the first row of control, set opening time as 10:00 and closing as 12:00, week as * and day as Wednesday. In the second row of control, enter any time (say, 10:00) for both opening and closing time and select * for week and * for day. And, if you leave the user_email blank, these two rules will be applied to all those in the group for whom no other special rules are created.
3 Creating a New Group by merging members of two other groups
If you have created two groups and you have added members in each group, and if you are interested in creating ai new group that should contain members of both the other groups, you can do so. First create a new empty group by clicking 'Devices Groups' under 'Device Groups' in the dashboard menu. Then click on 'Merge Device Groups' under 'Device groups' in Dashboard menu. You will see a page similar to Fig 134.
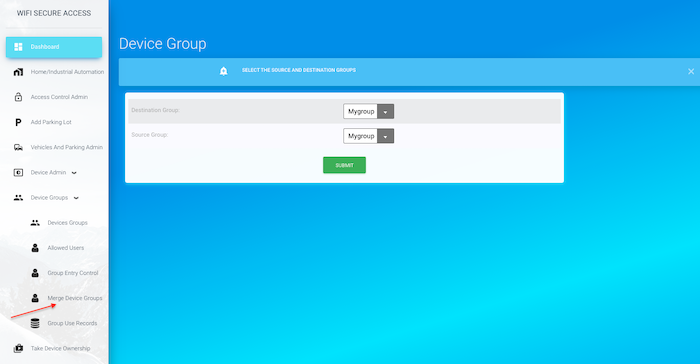
On this page, select Destination group as the new empty group that you just created. Then, select the first group that you want to add to this in the 'Source Group' field. Then press Submit. Next, repeat the same to add the second group to the same new group by clicking 'Merge Device Groups' and selecting Destination Group as the new group and selecting the second group for the 'Source Group' field. Then, press submit. Now, you have a new group with members of two of the other groups that you selected.
4 Entering an allowed user into a group using an HTTPS POST call from any of your applications
You can populate the allowed users of any group from any of your applications such as a booking platform using an HTTPS call. This feature helps integrate the WiFiSecureaccess door controller with your applications such as a booking platform. If these devices are installed, for example, on the door of a hotel room or an AirBnB room, the application platform that makes the booking can enter the customer's email and their start date and expiry date directly into the allowed user's list of the group associated with the controller device. If done, the customer will be allowed to open the door during the period between start-date and expiry-date. The customers can open the door either by a voice prompt, or by scanning the QRCode or NFC tag fixed on the door. Thus, this is an ideal system for hotels and AirBnB users. This eliminates the need to pass on the keys or access cards to the customer.To add the user to the evice's group, make an HTTPS POST call with the following details:
POST HTTP/1.1
Host: wifisecureaccess.com/8access/loadAllowedUsersJson/
Content-Type: application/json
data = { "email": your_email, "password": your_password, "device_group_name": device_group_name, "customers": customers }
-where customers is a double list of customer details.
customers = [customer1, customer2, customer3, ....]
-where each customer is a list as below:
[email_address, start_date, expiry_date]
For example, if you want to add two customers to the allowed group of a device, the customers should be as follows:
customer1 = [customer1_email, customer1_start_date, customer1_expiry_date]
customer2 = [customer2_email, customer2_start_date, customer2_expiry_date]
customers = [customer1, customer2]
Note: Leave start date and expiry date as "", if there is no start date or end date for that customer. If there is no start date, that means that the customer can access immediately. If there is no expiry date, the customer is authorized forever.
You can also remove any customer from the device's group with another HTTPS call as follows:
POST HTTP/1.1
Host: wifisecureaccess.com/removellowedUsersJson/
Content-Type: application/json
data = { "email": your_email, "password": your_password, "device_group_name": device_group_name, "customers": customers }
-where customers is a list of email address of the customers that you want to remove from the allowed list.
customers = [customer1_email, customer2_emal, ......].
Refer to section 8.2 of this documentation below to see more details about this and to see a sample python program.
5 Uploading allowed users from a file on your computer
If you have a file with email addresses of all the allowed users, you can upload that directly to any of the device groups, if you want. The file must be a txt file with multiple lines, with each line for each customer. The format of each line must be as follows:
-
customer_email, start_date_time, expiry_date_time, permissions
-
jack@gmail.com,2021-10-15 10:30, 2021-11-20 12:00,M
abcd@gmail.com, 2021-10-15 10:30, 2021-11-20 12:00
xyz@gmail.com, , 2022-06-10 2:00
john@gmail.com
jason@gmail.com, 2021-06-12 5:30
ray@gmail.com,,,M
Add additional line for each customer.
If you have such a file, you can upload that to any of your device group. Click on 'Upload Allowed Users' under Device Group in the Dashboard menu. That will prompt you to select the device group. Then select the file (browse) by clicking on the File tab. That will help you select your file from your computer. Then press Submit button. That will update the allowed users in that device group. This process will not delete any of the existing allowed users. Instead, this process add all the customers in this file to the existing allowed users of that group. If a customer is already in the allowed group, this will not overwrite it from the file. In that case, that line in the file will be ignored.
6 Downloading allowed users to a file on your computer
A list of all allowed users in a group can be downloaded to a file on your computer. Click on 'Download Allowed Users' under 'Device Groups" in the Dashboard menu. It will prompt you for the group name. Then it will download all the download users to a file on your computer. That wil will contain one loine for each user. Each line will have a format as shown below:
-
customer_email, start_date_time, expiry_date_time
7 Displaying number of people within an Office/Building
If you have installed separate doors for entry and exit, and if nobody is allowed to open or close the door either manually or by any other means other than wifisecureaccess system, the system keeps a count of the number of people within the room or building. If any of the door is for entry as well as exit (ENTRY/EXIT), you can install a separate QRCodes or NFC tags for entry and exits, instead of using the same tag for both. You can print the QRCode labels for entry as well as exit in the 'Configure Device' menu. Click on 'Configure device' under Device Admin in the dashboard menu (Fig 135).
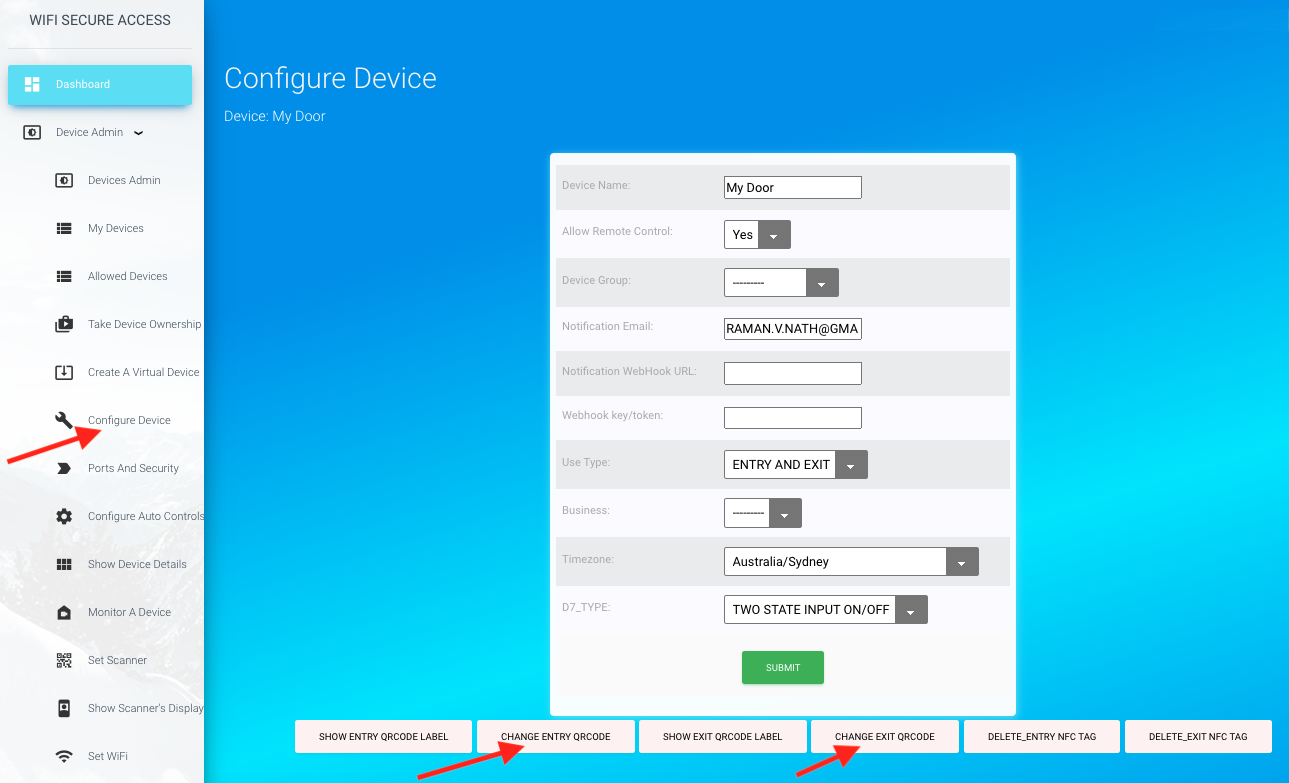
If this device usage is ENTRY/EXIT (meaning, used for entry as well as exit), you will see two separate QRcodes and NFC tags on this page. At the bottom of this form, you will also see links to print these labels. You print the Entry QR label and place it at a location that the people can scan when entering. Place the Exit label at a location where the people can scan when exiting. in Configure Device page, set 'Allow Remote Control' to 'No' so that nobody (other than the owner) can operate this door from remote. Make sure that the 'Allow Remote Control' is disabled on all doors of this building/office which are used for entry as well as exit. By doing so, the only way the users (other than the owner) can open these doors is by scanning the code at the door and not from remote. With this configuration, the system will keep a count of the number of people within the room/building/office. Note: The device_group is the same as the room or building and you could set device_group_name as the same as the room or building name
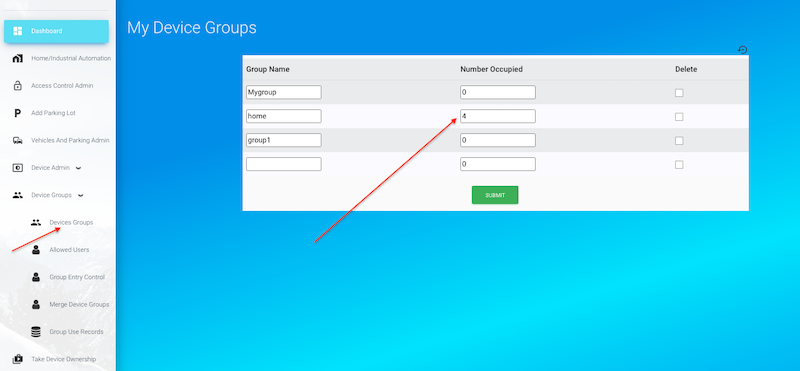
To display the number of people currently in the office/building (Device Group), click on 'Devices Groups' under under 'Device groups' in the dashboard menu. You will see the occupancy in all the groups that you have created as shown in Fig 136. Note: Ocupancy will be displayed only if you have at least one group configured with either separate doors for entry and exit or separate exit tags for exit on ENTRY/EXIT doors. Also, note that the accuracy of this depends on several factors such as 1) No one should be using any other means other than wifisecureaccess App to open/close the door/gate. 2) Remote access to open or close the door/gate must be disabled on ENTRY/EXIT type of doors/gates, and 3) Not more than one person enters or exits with one command to open or close. You can re-correct this number any time manually by editing this field.
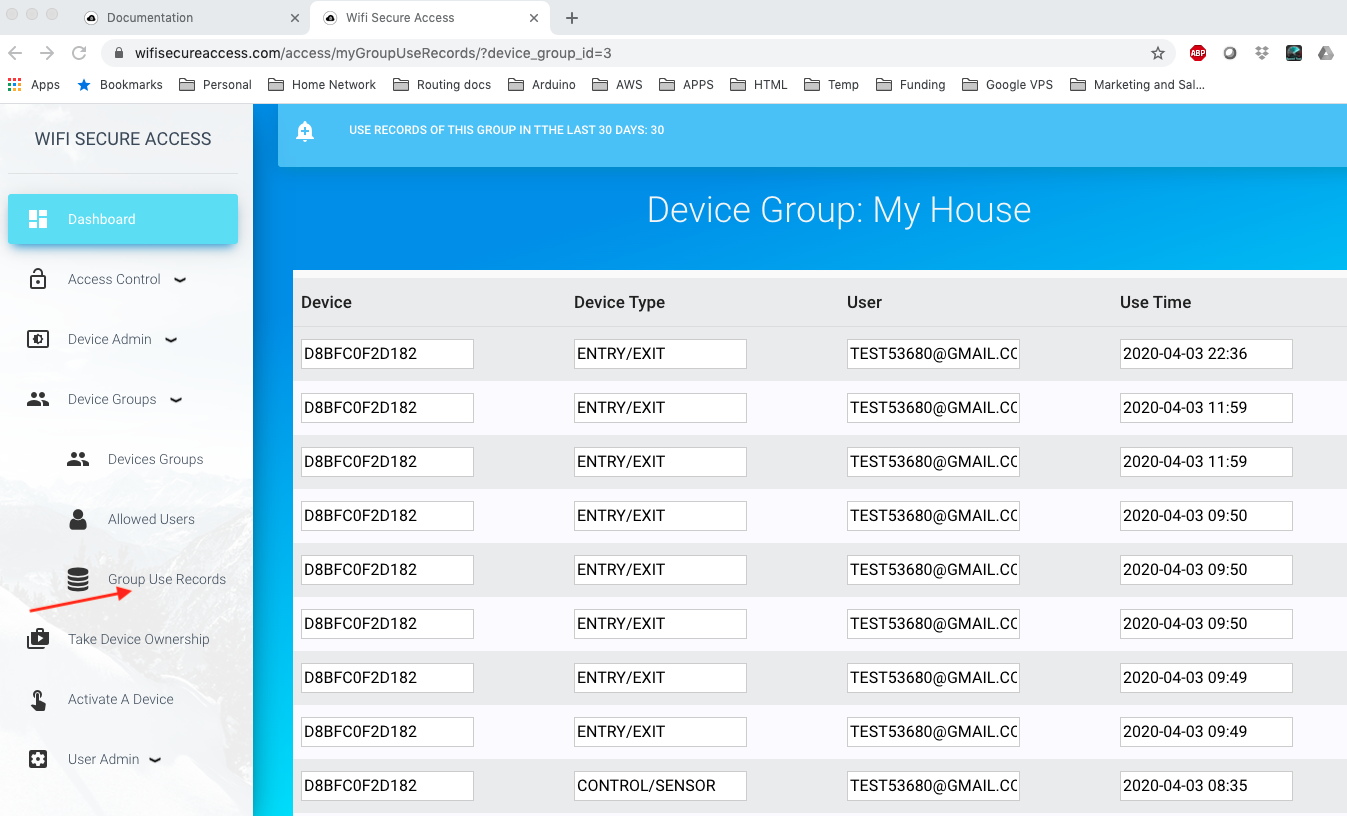
8 Group Use Records
The system keeps record of the use of all the doors/gates of this group. At any time, you can see who used this group at what time. To see the group use records, click on 'Group Use records' under "device groups' in the dashboard menu. If you have created multiple groups, you will be prompted to select the group. Once selected, you will see a page similar to Fig 137.
You can download these use records to your computer, if you want to do so for keeping any records, or for analysing the data. To download, click on 'Download Group Use records' under Device Groups in the dashboard menu. There you can provide the dates between which you want to download the data. Leaving any of these dates will take that date as open-ended. Leaving both dates as blank will download all the available use records for the past 30 days.
You can also add a program in any of your applications to download these records, and do analysis. These use records can be read using a python program. Refer to section 9.2 of this documentation.