Bhadre's Switches and Power Sockets
Bhadre's wall mounted (or panel mounted) touch switches are filled with several convenient features. They can be operated locally by touching the button. It will work regardless whther it is connected to WiFi or not. When connected to WiFi and internet, these switches can also be operated from remote either usinga smartphone or a comouter. They can also be operated using GoogleHome or Alexa. These switches can also be configured in 2-way, 3-way or multi-way without the need for any additional cabling. It is also possible to configure a switch such that, when it is activated, several other switches or equipments are also activated.
These switches and sockets can replaces the conventional switchs and sockets on the wall of houses and buildings providing several conveneint and user-friendly features.
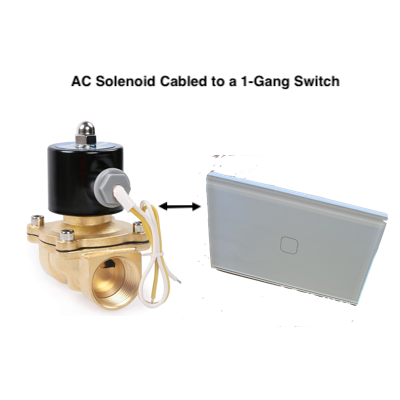
These switches and sockets can also be used for controlling AC solenoids with rermote and automatic controls.
This document explains how these switches and power sockets can be installed and configured to meet your needs.
1 Switches and Power Sockets
Bhadre provides several types of switches and power sockets. 1) 1-gang switch, 2) 2-gang switch, 3) 3-gang switch, 4) 4-gang switch, 2-gang Power Socket. Except the fact that they have different number of touch buttons and switches, they are similar in operation and configurations.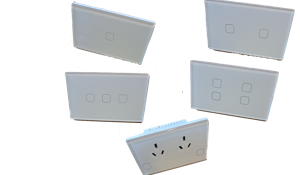
2 Installing on the wall or panel
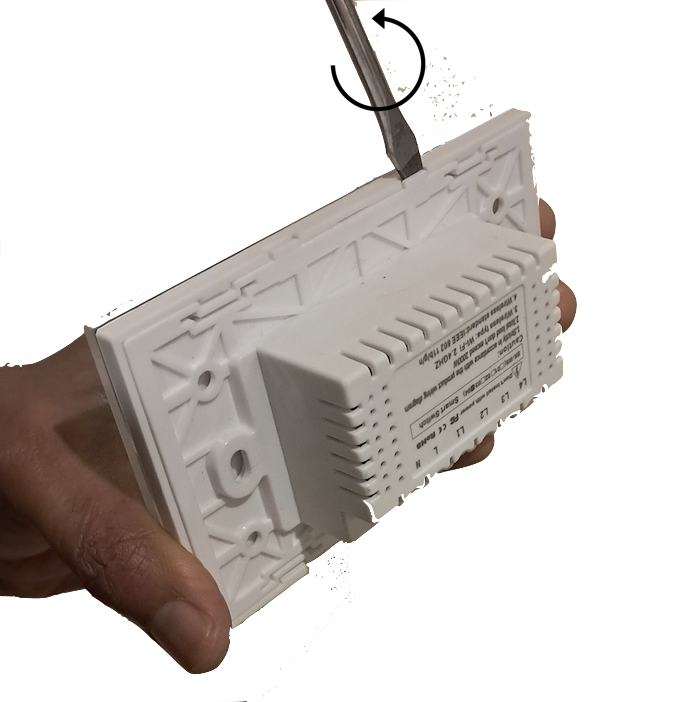
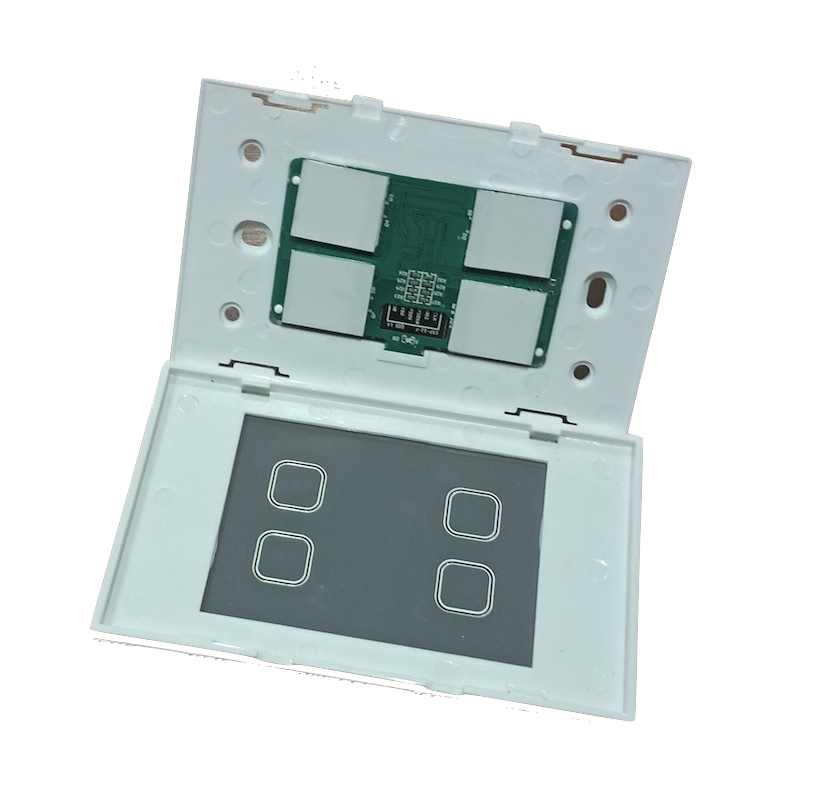
These switches and power sockets have identical dimensions of the standard wall switches and wall sockets. Therefore, these can replace the current switches and sockets on the wall. THe picture below shows how the front panel of these switches and sockets can be removed. Use a flat screw driver and push it into the slot shown below and twist it. Then pull the glass front panel out. That will expose the screw holes to fix the switches on the wall using the screws supplied with these switches. Once the switch is screwed in to the wall, push the glasss front panel back on to the switch
3 Initial Setup and Common Configurations
In order to use these switches, it needs some initial minimum configuration. These initial configurations are common to most of the devices of Bhadre. Click here to see the instructions on doing the initial configurations of these switches and sock4 Configuring 2-way switches
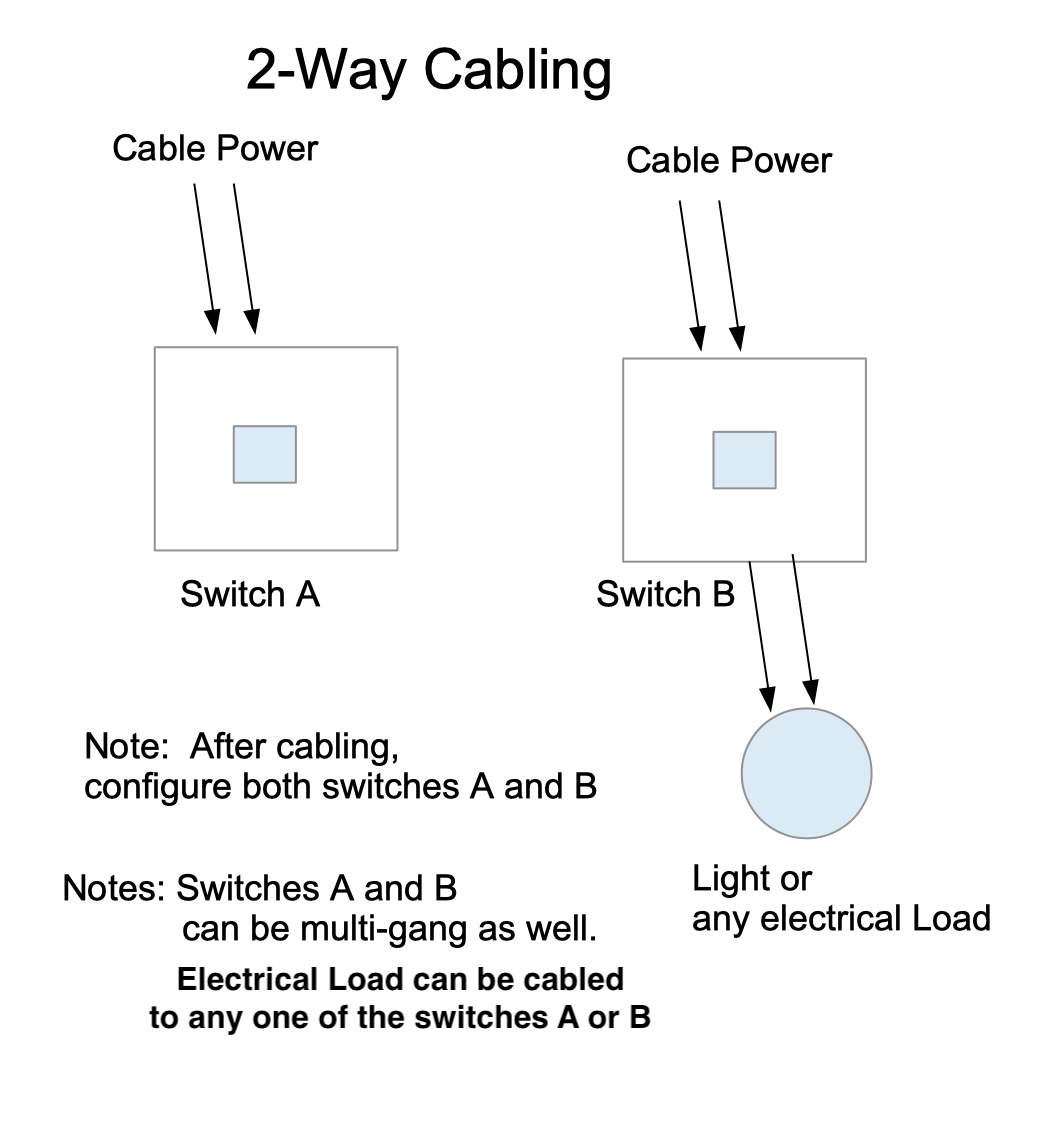
2-way configurations of two switches can be done without the need for any additional wiring. Wire the light (load) only to one of the two switches of the 2-way. No need to wire the lights to the other switch in a 2-way or multi-way configurations. 2-way switching is achieved through configurations of these two switches.To configure two switches, say Switch-A and Switch-B in 2-way to operte a common Light (load), say L1, cable L1 to any one of these switches, say Switch-A.
Then configure each switch as follows:
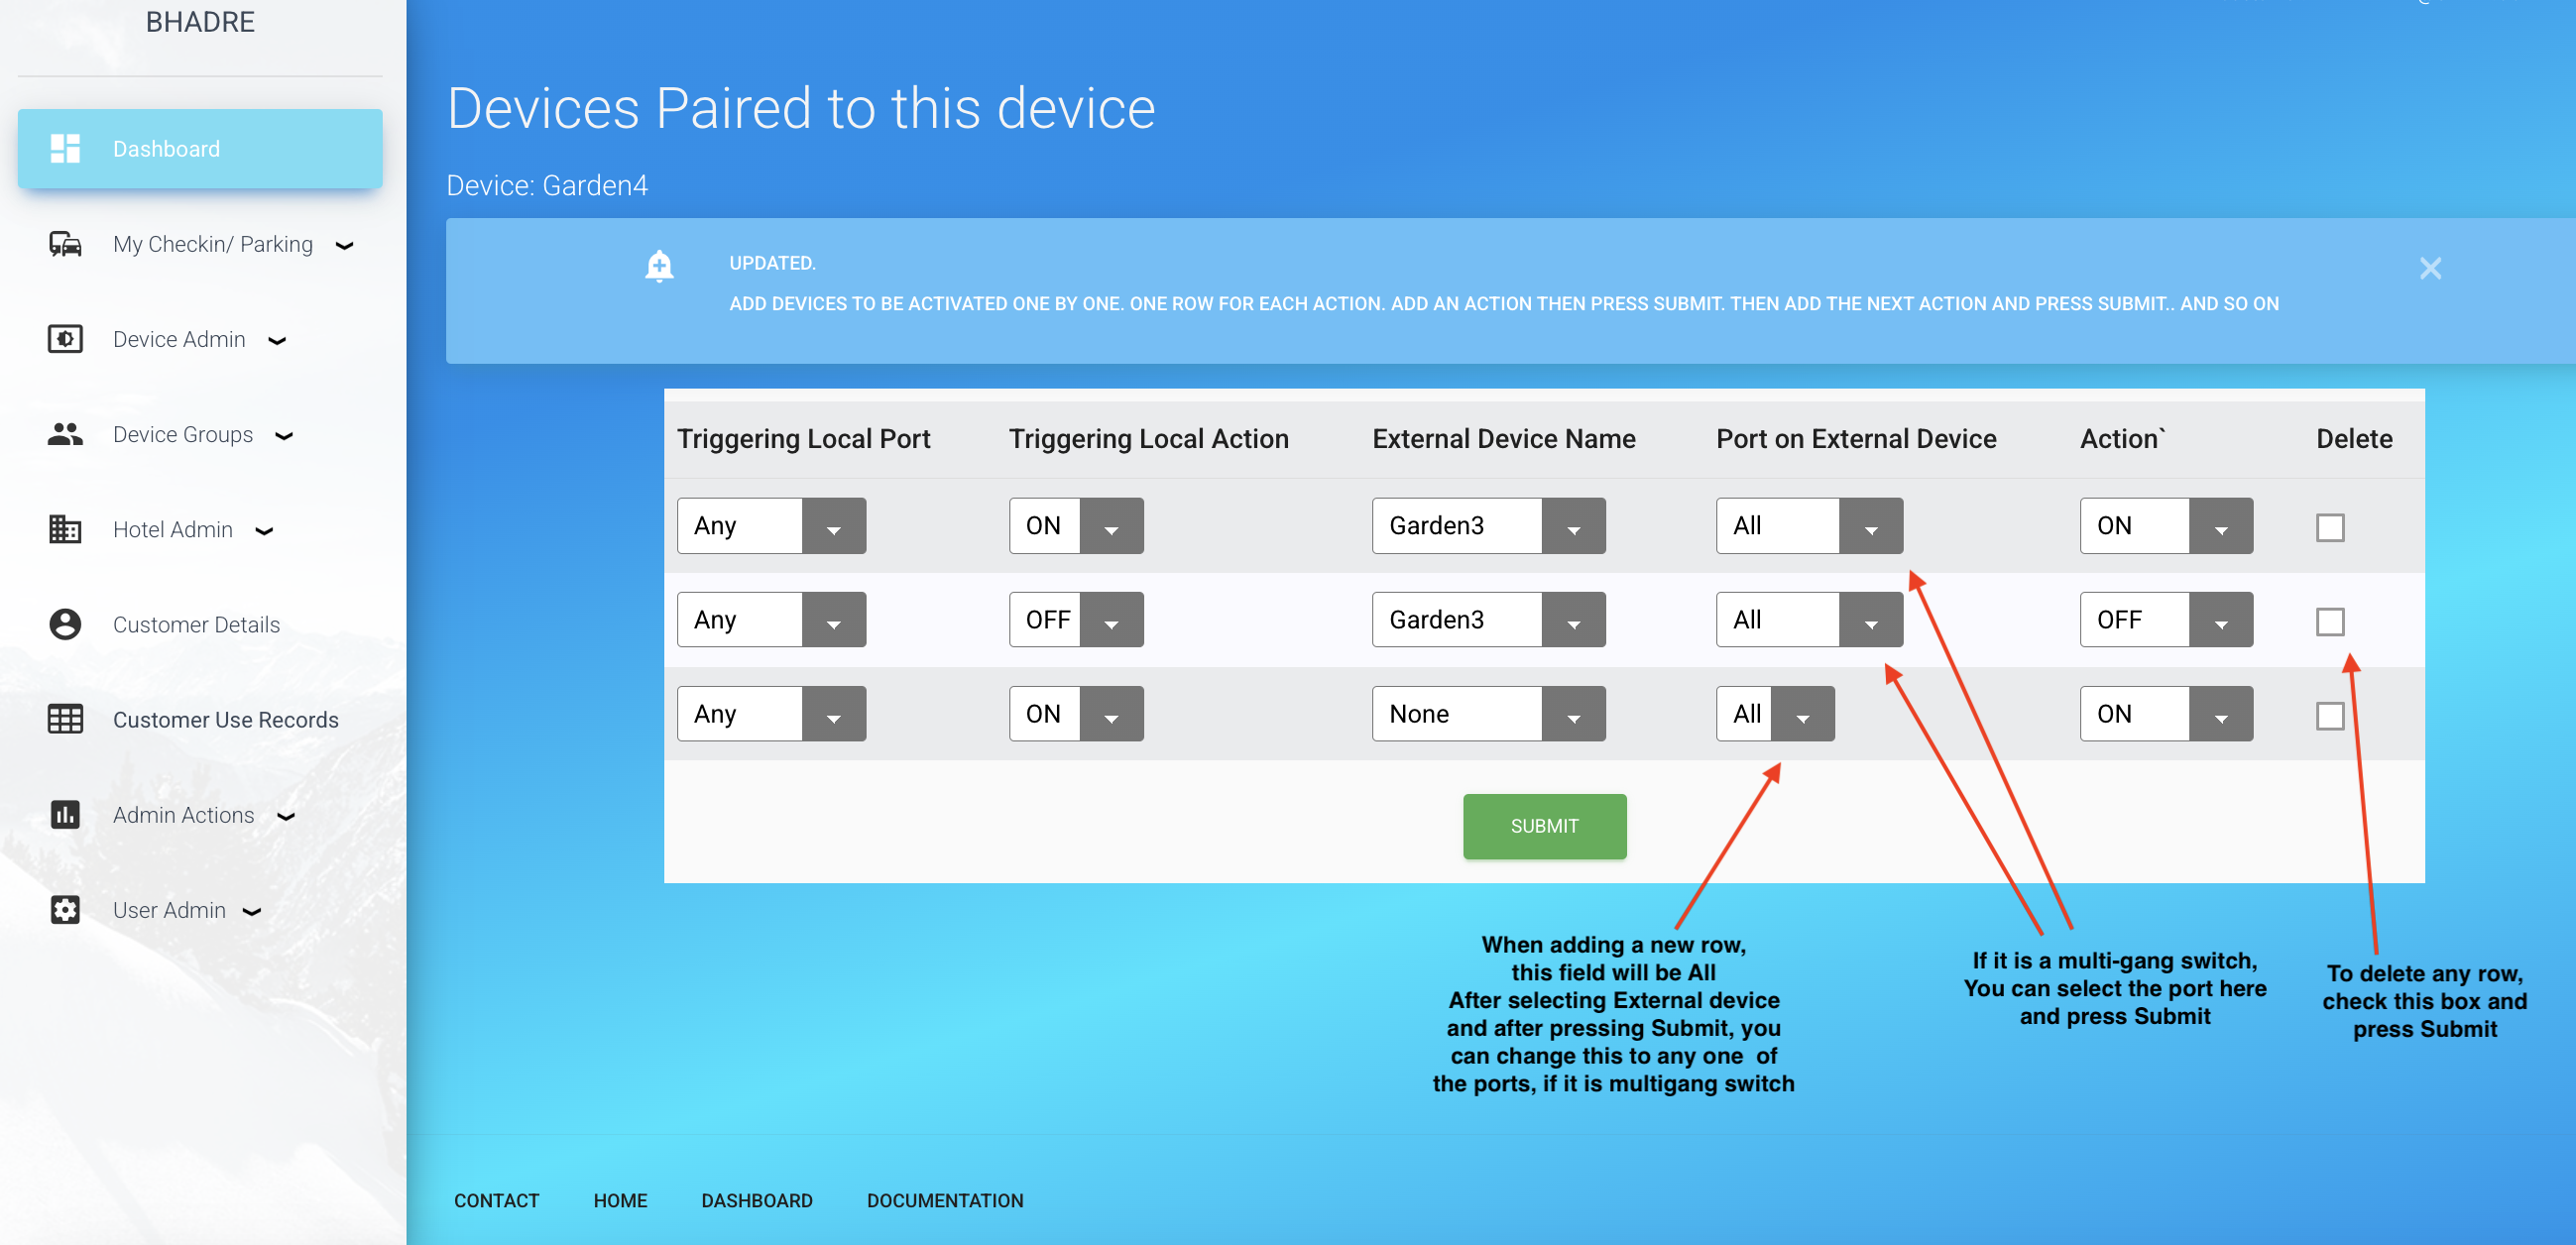
To configure, on a browser on a computer, go to https://bhadre.com. Then click on Admin Dshboard. Or, if you are using Bhadre App, press Admin Dasboard on its main opening page. It may ask you to login, if you are not logged-in already. If you are a new customer, click 'sign up' and follow the prompt to register. Once registered, you may be on Admindashboard's main menu. Then click on 'Device Admin'. In the opening page, click on 'Paired Devices'. On this page, select Switch-A as the device from the pull-down menu and press Submit button. That will present you another page where yiu can configure 2-way or mult-way. Fill up all the fields. "Triggering port" is the port on this switch (switch A). For "triggering action", select "ON", for external device, select Switch B, and for "external port" select the port on switch B. For "action select 'ON'. Then Submit. Now, you need to make another similar setting for 'OFF". On the same page, in the second row, select all fields the same as above except fot "triggering action" and "action". Select 'OFF' for triggering action and 'OFF' for action. Then press submit. Now, on this page you will see two rows of control setting and one blank row. The first row says that when the triggering port on this switch A is turned ON, the specified poprt on the Switch B must be turned ON. And, the second row say that when the triggering port on Switch A is turned off, the selected port on Switch B also must be turned OFF.
Next, do the same settings on Switch B. In thec Devices Admin page, select Paired Devices and select Switch B and submit. In ther opening page, do the same two settings that you just did for Switch A. When you do settings on Switch B, select the triggering port on the Switch B, and external device as Switch A and external port as the port of Switch A.
Note: When you try to select a port on the external device initially, the choices avaiable may be "All'. But, once yiu submit, you can change that to any port.
Once these settinghs are done, 2-way switch is configured. The equipment (Light or fan or any other eqipment) needs to ne cabled to one of these two switch only. The equipment can be operated from both switches. Multi-way switches on multiple switches can also be configured the same was as we just did.
Note: If you leave port nsme of any port as 'All' in a multigang switch, it will activate all the switches on that multigang switch.
Now test by operating Switch-A. You will see that the Light (or load on these switches) comes ON (if it was OFF). You can switch it OFF by pressing the button again. Do the same test on Switch-B. You will notice that Switch-B can also operate this light (or load).
5 Configuring multi-way switches
Multi-way configurations are similar to 2-way configuration that we just did in the above section. In a multi-way also, wire the light (load) only to one switch.

Then pair all other switches to each switch as per the steps given below.
Say, you have four switches (A, B, C, D) that you want to configure in a 4-way. If so, comnect the load (light) to only one of these switches (fot example, say Switch A). Then, configure switch B, C and D such that when their port is turn ON or OFF, the port on Switch A is also turned ON or OFF. This setting is exacly as done for 2-way switch in the previous section. Do similar settings on all switches to pair its port to corresponding port of all other switches.
Test it after configring all four switches. Once configured, ou should be able to operate this Light (or the load) from any one of those four switches.
6 Configuring a switch to activate many other switches or Controllers
It is ppossible to turn on several switches when one switch is pressed. To achieve that, configure the main switch such that all others are activated when this switch is activated. Use the 'paired switches' menu in the Devices Admin under admin Dashboard.
To configure switch A such that when it is operated, several other switches are also activated similtaneously, cnfigure switch A as follows:
Press 'Paired Devices' under 'Devices Admin' menu in Dashboard. Select a controller or switch in ther opening page and submit. In the page that opens next, add all other devices one at a time. When you complete adding all other devices, you will be seeing the name of all other devices in multiple rows on that page. Note: if you leave the port name as All, all the switches of that mult-gang switch will be activated. If you do not want that, select the Port name of each of those devices.
7 Cabling These Switches to AC Solenoids
AC Solenoids can be operated using these switches and be controlled with all the features available either from remote or automatically. Cable this to the coil of AC solenoid exactly the same way as you cable a light bulb. Multiple solenoids can be cabled by using multi-gang switches. All the powerfull features of this can be achieved by configuring as explained in Initial and Setup and Common Configurations.
8 Configuring Scheduled Actions or Additional Automatic Controls
This controller and mostly all the controllers from Bhadre have powerful features to configure automatic controls either scheduled periodic, based on sensors or other events on any other remote devices.
Refer to Configuring Automatic Controls to configure automatic controls as well as scheduled actions. Some of the automatic conytrols th at you can configure are turnong on/off switch automatically regularly at some time of a day or a week, or when a sensor detects an event at a remote location.