Parking/Public Access System Configuration
Bhadre provides a smart and cost effective system to manage access to public places and parking lots. Access to public places such as public transport, cinema halls, hotels, public/community event centers, or any such places can be managed easily and conveniently using our systems. In addition to managing access to people for such public places, one can use Bhadre system for managing public parking. With this platform, there is no further need to have any ticketing and ticketing machines. Customers can use their smart phones to access these. They can swipe the QRCode or NFC tags fixed at the entry gates/doors to get access. If there is an entry fee or parking fee, the customers will be charged either at the entry or exit automatically through their credit card.
With this system, customers can also book and hold a place from remote. All the registered public places as well as Parking lots will be shown on a google map. Public can also see on the map the current availability of all these registered public places and parking lots. They can see how many spots or seats are currently available, the opening and closing hours, and the the entry fee or parking fee, if applicable.
The owner of these public places or parking lots can configure access fees or parking fees. They can configure opening and closing hours, In this section of the documentation, you will learn how to register such public access places with WifiSecureAccess system, how to install smart devices at the entry and exit and how to integrate that with the gate actuators and how to configure the access control.
In this document when we say 'parking', it is also applicable to 'people checkin' and vise versa.
1 Installing Smart Devices and Cabling them to door/gates/Boom Gates
Cabling the Device to actuators on the doors and gates, or to boom gate of the parking lot is described section 2.8 of this document. Install smart devices at every entry gate and exit gate of the public place or parking lot. Either install the scanner or print additional QRCode label (or NFC Tag, if you are using NFC Tags) of the device and locate it at the convenient place at the gate so that the customers can scan them easily. Refer to section 3.7 of this documentation if you want to use additional QRCode or NFC tag other than the ones used with the scanner.
2 Enabling and using ultrasound sensors, if needed
If interested in detecting the vehicle in each and every bay of a parking lot, you need to install Bhadre controller at every bay of the parking lot and cable ultrasound sensors to it. Then position the sensor to detect the vehicles when parked in that bay as explained in section 2.9 of this documentation.
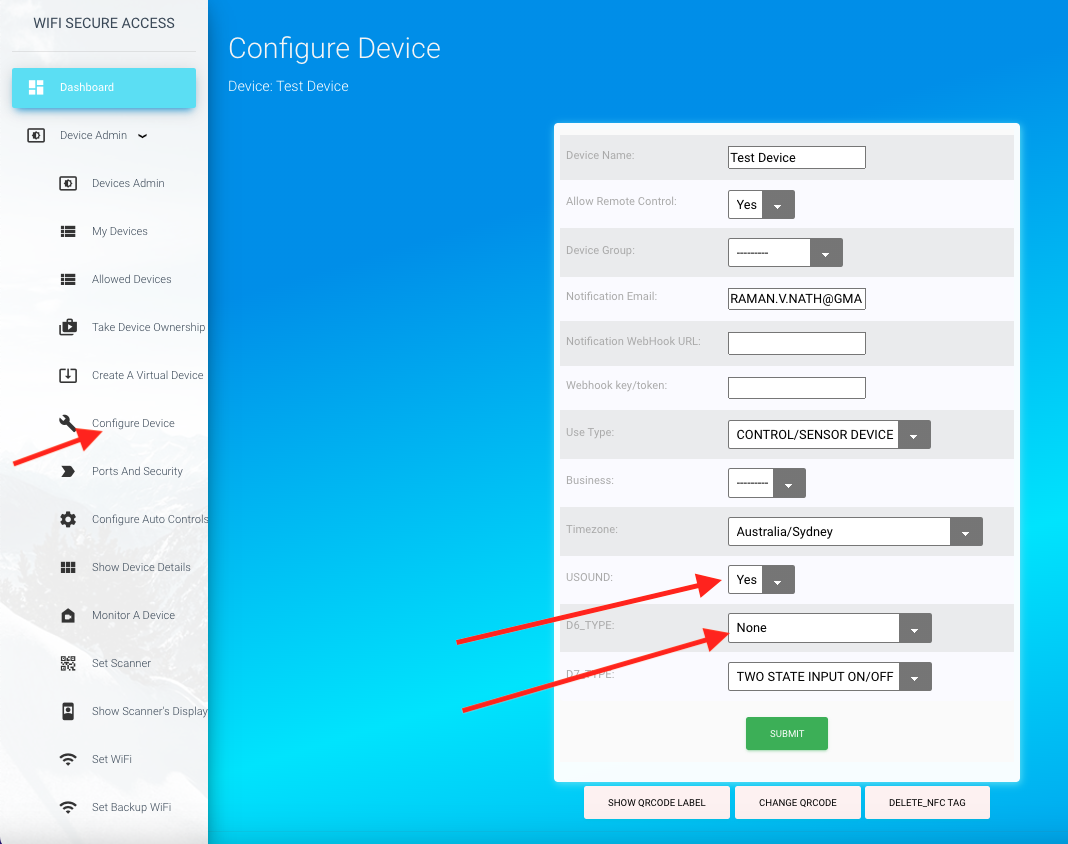
If ultrasound sensors are installed and cabled to Bhadre controller in that bay, that controller has to be configured to use the ultrasound sensor. To do so, click on 'Configure Device' in the left menu bar under Device Admin in Dashboard. Then select the controller to which the sensor is cabled. In the page that opens, you will see a field name 'USOUND'. By default, this is set to 'No'. Select USOUND to 'YES' as shown in Fig 138. Then press Submit.
Now, you can see the distance read by the ultrasound sensor on the Device Details page. Click on 'Show Device details' in menu bar in the left under Device admin. Then select the device. In the device details page that opens up, click on sensor Values. You will see a page similar to Fig 26 with the current value read by the ultrasound sensor under U_SOUND.
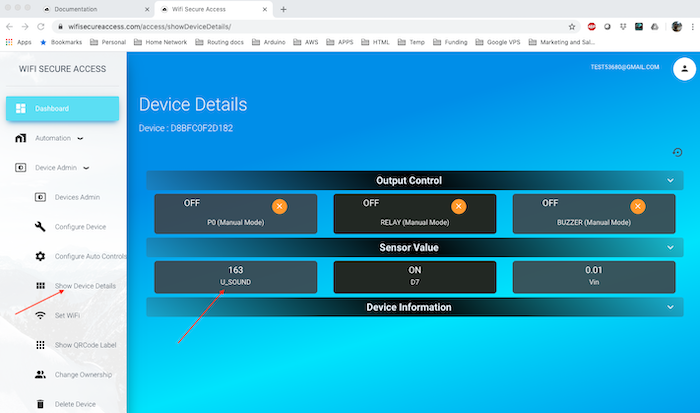
Refresh the page again to read again. Move the objects around ultrasound sensor and notice the actual distance measured. You need to refresh the page every time you move the sensor to display the new distance. Now, if this device is attached to a parking lot, the controller will detect automatically when a vehicle is parked in that bay.
3 How to register a Public Access Place or a Public Parking Lot with Bhadre
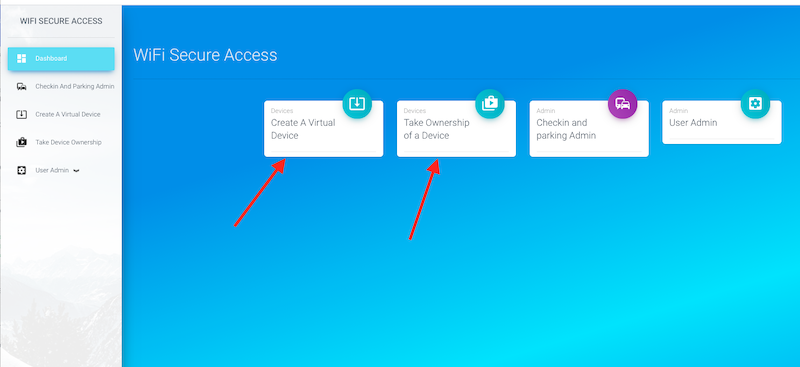
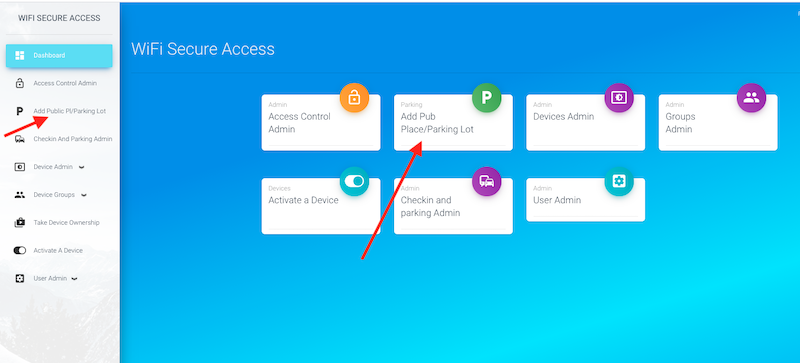
You need to first register your public place or parking lot with Bhadre providing a unique name and its address. Address must be identifiable by Google maps. To register, click 'Dashboard'. If you have not used Bhadre yet, you will be asked to login or register yourself and will be taken to a login page. Once loged in, you will be taken to the index page where you will see several options. If you have not purchased and registered any WifiSecureAccess controllers yet, you will see some tabs to 1) 'Take ownership of a device' and 2) Create a Virtual Device. If you have purchased a controller, click on 'Take ownership of a device' and follow the prompt. Or, if you want to work with a virtual device, click on 'Create a virtual device'. A virtual device is just a label with a QRCode, or NFC tag. A virtual device is enough to manage access to public places and parking lots if you do not want it to control its gates or doors. Physical controller is required to control the doors and gates at the entry and exit. Once you have taken ownership of a controller, or created a virtual device, you will see a button named 'Register Public Place/Parking Lot' in the main dashboard page. If you already have another parking lot in the system, you will see a button name 'Public Place/Parking Lot Admin'. If so, click 'Public Place/Parking Lot Admin'. That will show the button 'Register Public Place/Parking Lot'. Then click on 'Register Public Place/Parking Lot'.
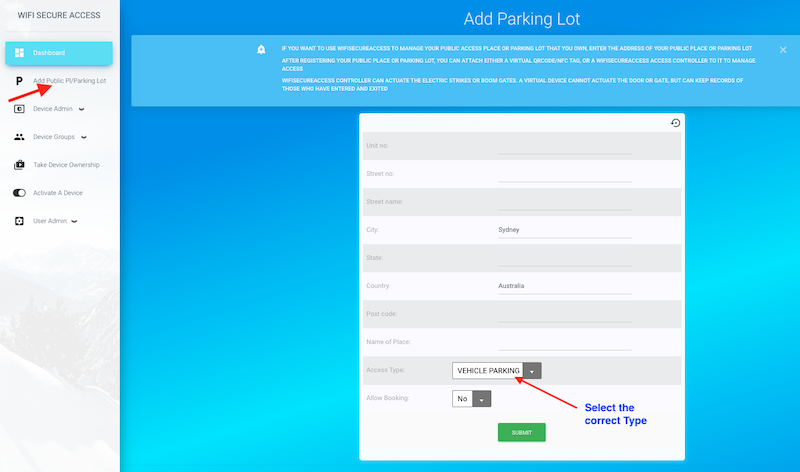
When you click 'Register Public Place/Parking Lot, you will be presented with a page similar to Fig 143. This form is asking you to enter its name and the address of the public place/parking lot. The name must be unique in the system. You cannot use a name that is already used by others. It will prompt you if it finds a conflict. Enter the address correctly. Also choose Access Type correctly. If this is a public place such as cinema hall or any public event hall for people access, then select Access Type as 'People Access'. If this is a parking lot, select Access Type as 'Vehicle Access'. Also select whether you want to allow booking or not. Then press submit. If you have entered a valid address, it will add this public place/parking lot into the system and will display a page similar to Fig 144 showing the details of all your parking lots. If the system is unable to find such an address, it will display some error messages. Correct the errors and re-submit.
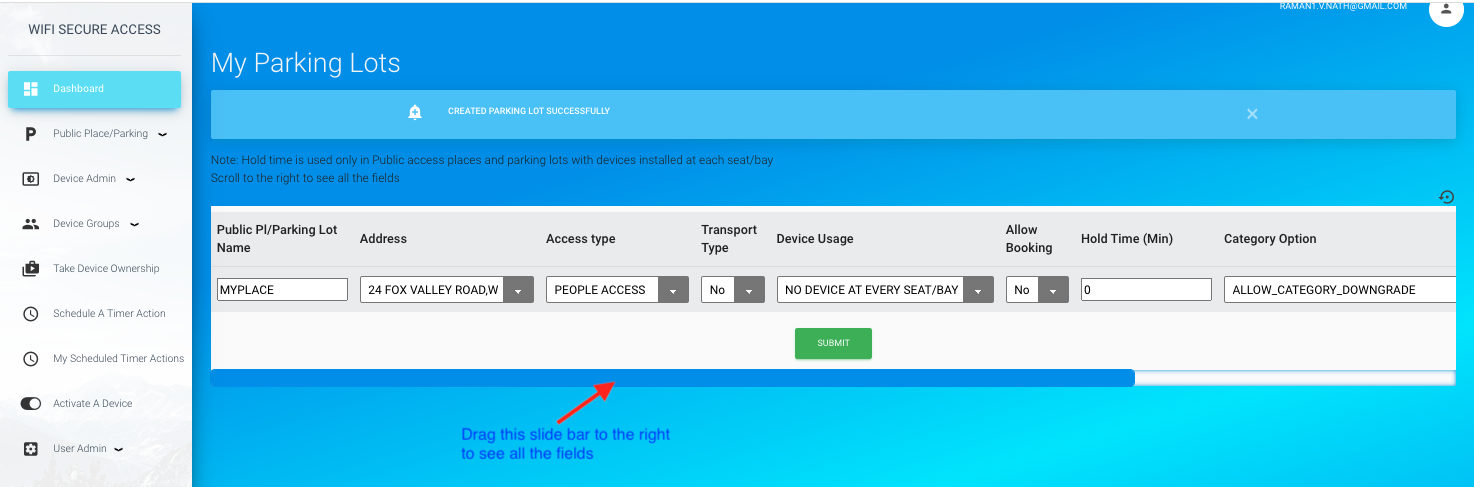
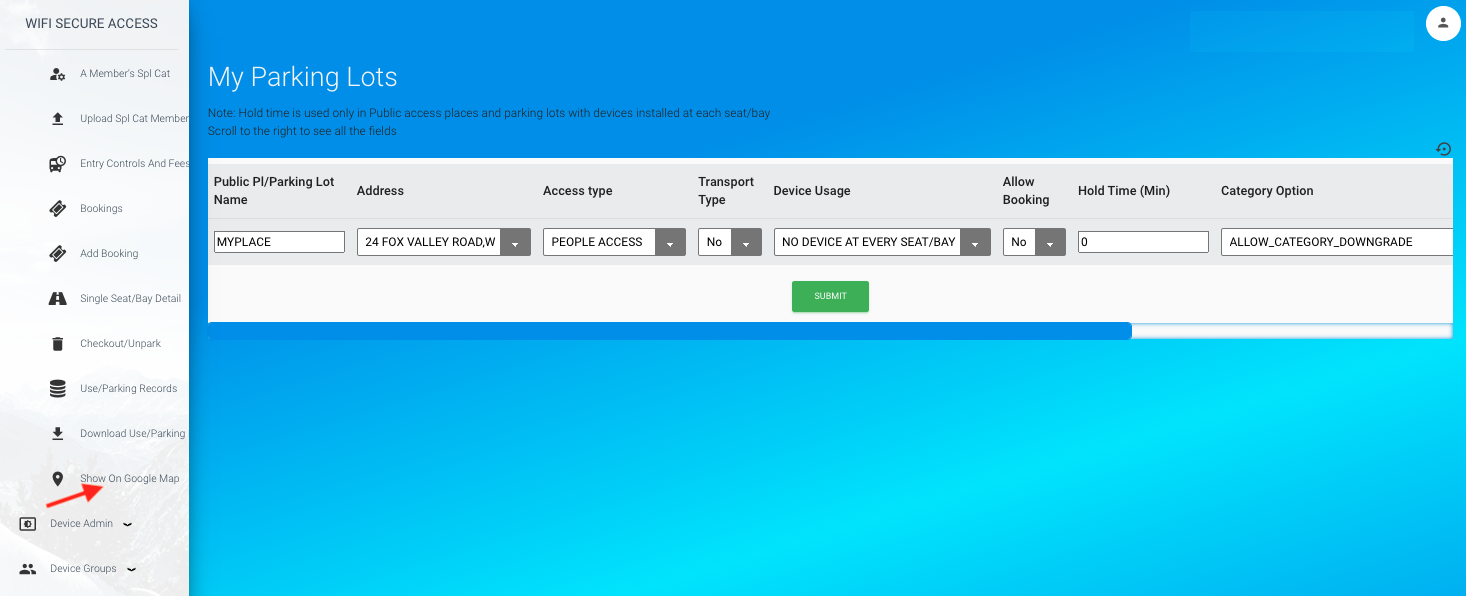
On this page, you can make any additional changes. You will see several additional fields in this form. They are:
When all fields are entered correctly, press Submit. Now that you have registered you public place/parking lot, you can see this in a Google Map. Click 'Public Pl/Parking Lot Map' under 'Public Place/Parking lot' in the Dashboard menu in the left sidebar menu.1. Access Type: This field sets the type of the premise - whetrher this is a parking lot for parking vehicles or whether it is a place for people access such as cinema halls, public event halls, buses and trains and so on. There are two options for this field. Select according to what this place is used for.
2. Transport Type: This field sets whether or not this is used for public transport such as buses, trains, or planes. If this is used for public transport, set this field as Yes. Otherwise, set it as No. The default is No.
3. Device Usage: This field is autoset and cannot be changed by users. This field is for information only. This field shows whether the public place/parking lot has devices installed at every seat/bay of the public place/parking lot. If you want to manage every seat/bay of the place, you can install devices at every seat/bay in addition to controllers (devices) at the entry and exit. If you ever install like that, this 'Device Usage' field will show it as DEVICE AT EVERY SEAT/BAY'.
4. Hold Time: This is the time in minutes a seat/bay in a public place or parking lot can be held by a customer while driving to that location. The default is 0, indicating that holding a seat/bay is not allowed. If you set this field as 0, nobody can hold a a seat/bay. To allow this feature, set the Hold Time to the number of minutes that you woould like to allow holding.
5. Category Option: There are two options here. 1) ALLOW CATEGORY DOWNGRADE and 2) DO NOT ALLOW CATEGORY DOWNGRADE. If you select the first option, customers can access a lower entry/parking category when the seats/bay in the category of the customer is full. For example, if the public place/parking lot has several categories of checkin, and if the customer's category is, say, 4 and, say, if all seats/bay in category 4 are currently full, the customer will be allowed to checkin to category 3 if seats/bay in category 3 are available, if this field is set to "ALLOW CATEGORY DOWNGRADE". These categories have to be configured for your public place/parking lot after registering the public place/parking lot. In the later sections of this document, you will find the steps for that.
6. Allow Waiting: If you choose the option “Allow Waiting”, customers will be allowed to enter the public place/parking lot and wait within the public place/parking lot when the place is full. On the other hand. If “DO NOT ALLOW WAITING” option is chosen, no customer will be allowed in when it is full.
7. Info Link: You can give a url of your website here (if you have one) describing more about your public place/parking lot. If a link is given, that link will be available for customers to click in the pop up window in the Google map. They can click on the name of your public place/parking lot and it will take them to your site.
On the google map, you will see a marker at your address, as shown in Fig 146. The colour of this marker will be red when there is no space available for parking. It will change to green when there are parking space available in this parking lot.
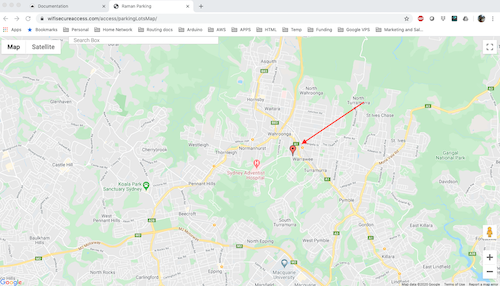
Click on that marker. It will show a pop up window similar to Fig 147.
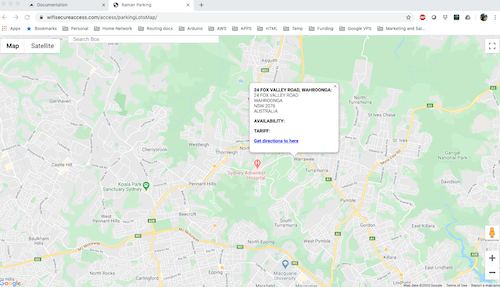
By default, number of seats/bays available is set to 1 in the default category 'General'. So, if you click on the marker against your place in the google map, it will show the availability as 1 in General category. The popup window that is displayed when you click on the marker will show links to directions to this location. If you have enabled booking and hold, you will see links to book a seat/bay as well as to hold a seat/bay in this public place/parking lot. If you had entered a url for your parking lot in the info link when you created the parking lot, motorists can get to your website by clicking the name of your parking lot in the popped up window.
The Google map shows all the registered public places as well as parking lots. The marker will be red, if no seat/bay is available in that place at this time.
Described above are the steps for registering your public place/parking lot with Bhadre. In the following sub-sections of this documentation, we will describe how to configure further details of this public place/parking lot and make it available to public.
4 Configuring Devices at Entry and Exit Gates or Doors
It is now necessary to configure all the smart devices that are installed at the entry and exit gates of this public place/parking lot. Do the following steps on each and every one of those smart devices. As mentioned earlier, the devices can also be virtual device with just a QRCode or NFC tag.
Click on 'Configure Device' under Device Admin in Dashboard. You will see a page similar to Fig 148.
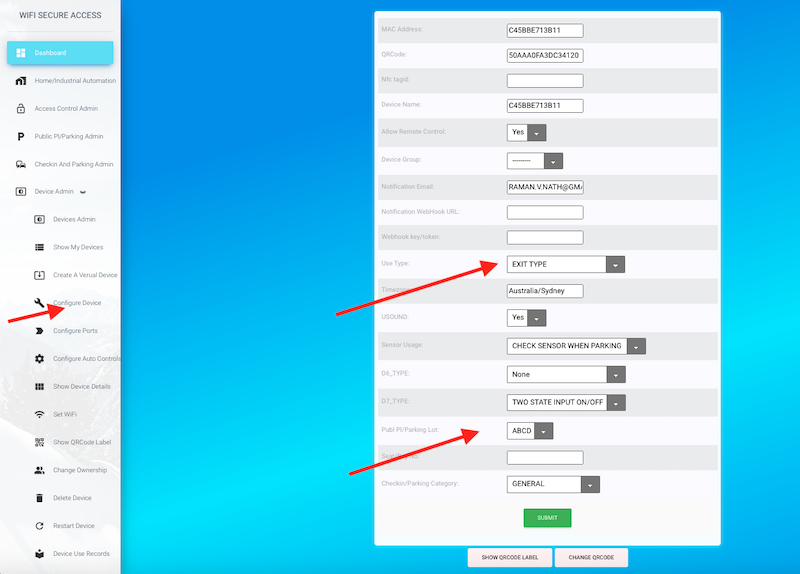
Choose a device installed and cabled at the entry or exit doors/gates/seats/bay. To make this smart device a part of your public place/ parking lot, select and choose your public place/parking lot from the pulldown menu of the Public Pl/Parking Lot field of this form.. The system finds the timezone of the device from the address of the parking lot. So, try not to change it. Give a name of your choice to this device. And, select the 'Use type' as 'ENTRY TYPE', if this device is at the entry gate, or 'EXIT TYPE', if this device is at the exit gate of the parking lot. If the device is installed at a seat or bay, choose 'ENTRY AND EXIT'. Then press Submit. If this device is not a virtual one, you will notice that the device gets restarted and the LED colour changes to Green.
You can set 'Allow Remote Control' to 'No', if you want to. If you set it to 'No', those who are allowed in the selected group will not be able to activate this device from remote. If selected 'No', the only way anyone (other than the owner of the device) can activate it is by scanning its QR Code or NFC tag. Note that this has nothing to do with the public. Public people can activate it only by scanning the QR code or NFC tag regardless of this setting.
Note: Depending on the type of door/gate, you may have to selectively add the word 'Parking', or 'Gate' in the device name or its port label, as explained in section 3.7 through 3.10 of this documentation. For operating the actuators on the door/gate/boom gate, this naming is required so that the controller knows what type of actuators it is controlling.
It is possible to install this device as a parking meter at every bay of roadside parking. If you want to do that, ultrasound sensor has to be installed on the device to sense the presence of a vehicle. Connecting ultrasound sensors to the smart device is explained in section 2.10 of this documentation. Position the ultrasound sensor to sense the presence of a vehicle in that bay. Then, in the 'Configure Device' page, select USOUND as YES. And, select Use Type as 'ENTRY AND EXIT'. You also have to assign a bay number. Try to give the bay number something meaningful. You could name the bay as, for example, A1 meaning this is in row A, position 1.
If smart devices are installed at every bay, try to give bay numbers similar to 8A4, meaning it is on 8th floor, row A, position 4. That kind of numbering of bays will not only help the customers to locate the bay easily, but also will help the system in helping motorists to suggest nearest available parking bay.
Installing ultrasound sensors are required only if you want to sense if anybody is illegally occupying a seat/bay without proper checkin. Installing sensor will also help send notifications to the administrator of this public place/parking lot when someone is occupying a seat/bay without checking in and when parking is expired.
You will also notice that the Use Type has another option called 'PRIORITY GATE'. This is a gate that can be used for special parking categories within a public place/parking lot. If a smart device is installed at these gates, 'PRIORITY GATE' option must be selected for that device when configuring it. In later sections of this document, you will learn how to create special categories of customers.
PS. Devices of use type as "PRIORITY GATE' must not be installed at any main entrance. It must only be installed within a public place or parking lot to move from one category to another (or from one section to another). Devices of this type does not validate a checkin. It allows those who are checked in to move from one section to another based on their special categories.
5 Configure Entry/Parking Categories and maximum Spaces Available in Each Category
The next thing to do after registering a public place/parking lot is to configure entry/parking categories and number of spaces available in this public place/parking lot in each category. There are two types of access categories: 1) General and 2) special. General categories are for general public whereas the special categories are for restricted public. These categories will help setting different access fees and access times for different categories of checkin. Special categories are reserved for those whom you authorise. At the time of checkin, the customer selects which category he wants to checkin. If he has chosen a special category, the system will check if he is authorized to check into that category. You can create a maximum of 10 categories with different priorities in each. A category priority number greater than 9 is considered as special category. The higher the priority number, the higher is the priority.
To create an access category in the pblic place or parking lot that you own, click on 'Access Categories' under 'Public Place/Parking' in the dashboard menu. That will open up a page as shown below.
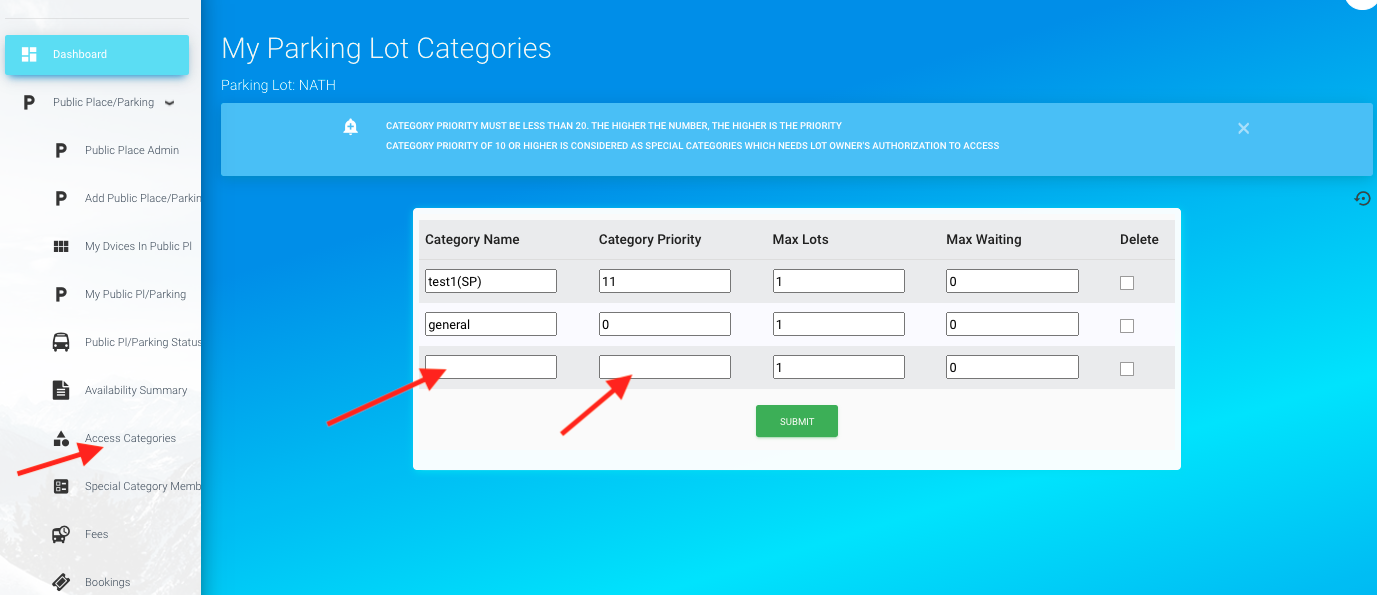
If this is the first time you are opening this page, it is possible that you may find that GENERAL category is pre-configured by the system with a maximum lots as 1. You can delete, and/or add more categories. In each public place/parking lot, the Category name and category Priority must be unique, meaning that no two categories can have the same name and same priority. When you enter a priory number greater than 9, it is assumed that it is a special category and '(SP)' will be added automatically by the system to the name of the category. This is to distinguish it from the other categories. You may also enter how many maximum spaces are available in your public place/parking lot. If this is a public place or parking lot with devices in each seat/bay with ENTRY AND EXIT mode, the maximum Lots is auto-calculated, and whatever you enter will be over-written by the system.
The system gives an additional feature of 'Max Waiting'. This is a number of people/vehicles that can wait inside the Public Place/Parking Lot when the place is FULL. By default this is 0. You may enter any number in this field if you want to allow this in your public place/parking lot.
Once you entered all the fields, you may press the Submit button.
When you press Submit, you may see a messages saying that a Tariff Table has been created automatically with free checkin/parking. You can change ths by clicking appropriate links in the “Parking Lots Admin” page, as described in the following section of this document.
Now, if you click on “Public Pl/Parking Lots Map" under Public Place/Parking Lot Admin in Dashboard, you will see that the marker on your parking lot is Green and, if you click on that marker, the pop up window will show the number of spaces available in each category you configured. It also shows the tariff as 0.0, as the default tariff (check-in/parking fee) is free.
Special categories
As mentioned earlier, you can create special categories for special people. If you have created any special category with priority greater than 9, general public cannot check into these areas. Only those whom the owner of the public place/parking lot has approved can get access to there. To approve someone to check-in/park in any of these special categories, the owner has to add their email address against each of those category. It can be added by the owner of this public place/parking lot by clicking “Special Category Members” on the “Public Place/Parking Lots Admin” page. When you click that link, you will see a page similar to Fig 151. If you own more than one public place/parking lot, you will be prompted to choose one before getting to this page.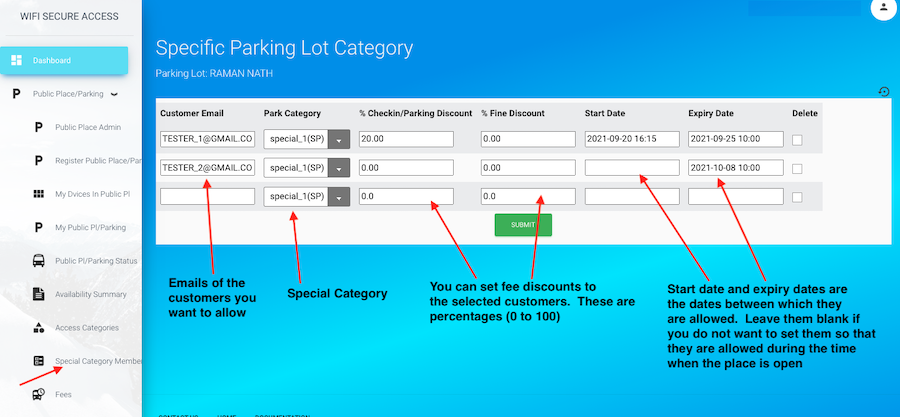
On this page, select the category and add the email address of the customer whom you want to add to any special category. When you add an email address, choose which category you want to add that person to. You can choose any category that you have created including the general categories. Adding to general categories will not have any effect on their access. However, the discounts that you set will be used in computing fees and fined to those in the general categories. Add one customer at a time. Press Submit button when you add one entry. To add a customer's email, that customer must have registered with wifisecureaccess.com. in fact any customer who checks-in/parks in these seats/bay will have to install our mobile app to scan the QR code or NFC Tag at the entry and exit. So, they need to register with wifisecureaccess.com.
When adding a customer to a special category, the owner can also specify any discount in entry/parking fees for those customers on an individual basis. '%Parking Discount' and '%Fine Discount' are the percentage discount offered to tose customers added to any of these categories. So, by entering selected customers, the owner of the public place/parking lot can offer discounts for them. This discount can be offered to any selected customer in any category. You can also set Start Date and Expiry Date for each customer in Special categories. If set, this customer will be allowed only during the period between Start Date and Expiry Date. Customer will be removed from this special category automatically. These dates must be entered in the format yyyy-mm-dd hh:mm, where hour(hh) is in 24 hour format. Leave them blank if you want to allow this customer all the time during the period the place is open.
Note: There is an additional feature that may help some times: If you have added a customer in any of the special categories, and at the time of his checkin, if the place is full in that special category, what must be done ? This is decided by the "Category Option' setting in the Public Place/Parking lot as discussed earlier (Fig 145). If you set that as 'ALLOW CATEGORY DOWNGRADE', that customer will be allowed to check into the general categories if those categories are available. If you set that to 'DO NOT ALLOW CATEGORY DOWNGRADE', that customer will not be allowed to checkin when the special category to which he is authorized is FULL.
6 Updating members of Special category through an HTTPS POST call from any of your other applications
Similar to what we have explained in section 4.4 of this documentation, you can integrate wifisecureaccess with any of your applications (such as online booking) and update the special category through an HTTPS call from that application to wifisecureaccess.com. If Bhadre controllers are installed at the gate of parking lots to control the boom gate (or whatever door they have), the application platform that makes the booking can enter the customer's email and their start date and expiry date directly into the allowed user's list of the group associated with the controller device. If done, the customer will be allowed to enter the parking lot or public place during the period between start-date and expiry-date. The customers can open the gate by scanning the QRCode or NFC tag fixed at the gate. Thus, this is an ideal system for public places (such as cinema halls and other public event places) and parking lots. This eliminates the need to carry tickets and other documents to enter the place..To add customers to a special category of a public place or parking lot, make an HTTPS POST call with the following details:
POST HTTP/1.1
Host: wifisecureaccess.com/access/addMembersSpCatJson/
Content-Type: application/json
data = { "email": your_email, "password": your_password, "parking_lot_name": parking_lot_name, "customers": customers }
-where customers is a double list of customer details.
customers = [customer1, customer2, customer3, ....]
-where each customer is a list as below:
[email_address, start_date, expiry_date, fee_discount, fine_discount,]
Note: Whenever we use the word 'parking lot', it also means any public access place in addition to parking lot
For example, if you want to add two customers to the allowed group of a device (controller), the customers should be as follows:
customer1 = [customer1_email, customer1_start_date, customer1_expiry_date, customer1_fee_discount, customer1_fine_discount,]
customer2 = [customer2_email, customer2_start_date, customer2_expiry_date, customer2_fee_discount, customer2_fine_discount,]
customers = [customer1, customer2]
Note: Leave start date and expiry date as "", if there is no start date or end date for that customer. If there is no start date, that means that the customer can access immediately. If there is no expiry date, the customer is authorized forever.
As mentioned before, fee_discount and fine_discount are in percentages (0.00 to 100.00)
You can also remove customers from a special category with another HTTPS call as follows:
POST HTTP/1.1
Host: wifisecureaccess.com/removeMembersSpCatJson/
Content-Type: application/json
data = { "email": your_email, "password": your_password, "parking_lot_name": parking_lot_name, "customers": customers }
-where customers is a list of email address of the customers that you want to remove from the allowed list.
customers = [customer1_email, customer2_email, ......].
Refer to section 8.3 of this documentation below to see more details about this and to see a sample python program.
7 Uploading members of Special Categories from a file
If you have a file with email addresses of all the members whom you want to add to the special categories, you can upload that directly to any of the special categories. The file must be a txt file with multiple lines, with each line for each customer. The format of each line must be as follows:
-
customer_email, start_date_time, expiry_date_time, entry_fee_discount, fine_discount
-
abcd@gmail.com, 2021-10-15 10:30, 2021-11-20 12:00, 20.0, 10.0
xyz@gmail.com, , 2022-06-10 2:00, 39.0
john@gmail.com
jason@gmail.com, 2021-06-12 5:30
Add additional line for each customer.
If you have such a file, you can upload that to any of your special categories of any of your public place or parking lot. Click on 'Upload Spl Cat Members' under Public Place/Parking Lots Admin in the Dashboard menu. That will prompt you to select the public place/parking lot. In the opening page, select the access category. Then select the file (browse) by clicking on the File tab. That will help you select your file from your computer. Then press Submit button. That will update the special category of that public place or parking lot. This process will not delete any of the existing members. Instead, this process add all the customers in this file to the existing members. If a customer is already in the special category, this will not overwrite it from the file. In that case, that line in the file will be ignored.
8 Downloading members of Special Categories to a file
The list of members of any special category can also be downloaded to a file on your computer. Click 'Download Spl Cat Members' under 'Public Place/Parking Lot admin' in the dashboad menu. It will prompt fot the public place/parking lot. Then it will prompt for the category. Then, it will download the list of members to a file on your computer. This file will have one line for each member. Each line will have the following format:
-
customer_email, start_date_time, expiry_date_time, entry_fee_discount, fine_discount
9 Configure Access Fees or Parking Fees
To configure entry/parking fees and fines, click on 'Entry Control and Fees' under 'Public Place/Parking Lots Admin' in the Dashboard menu. You will be presented with a page similar to Fig 152.
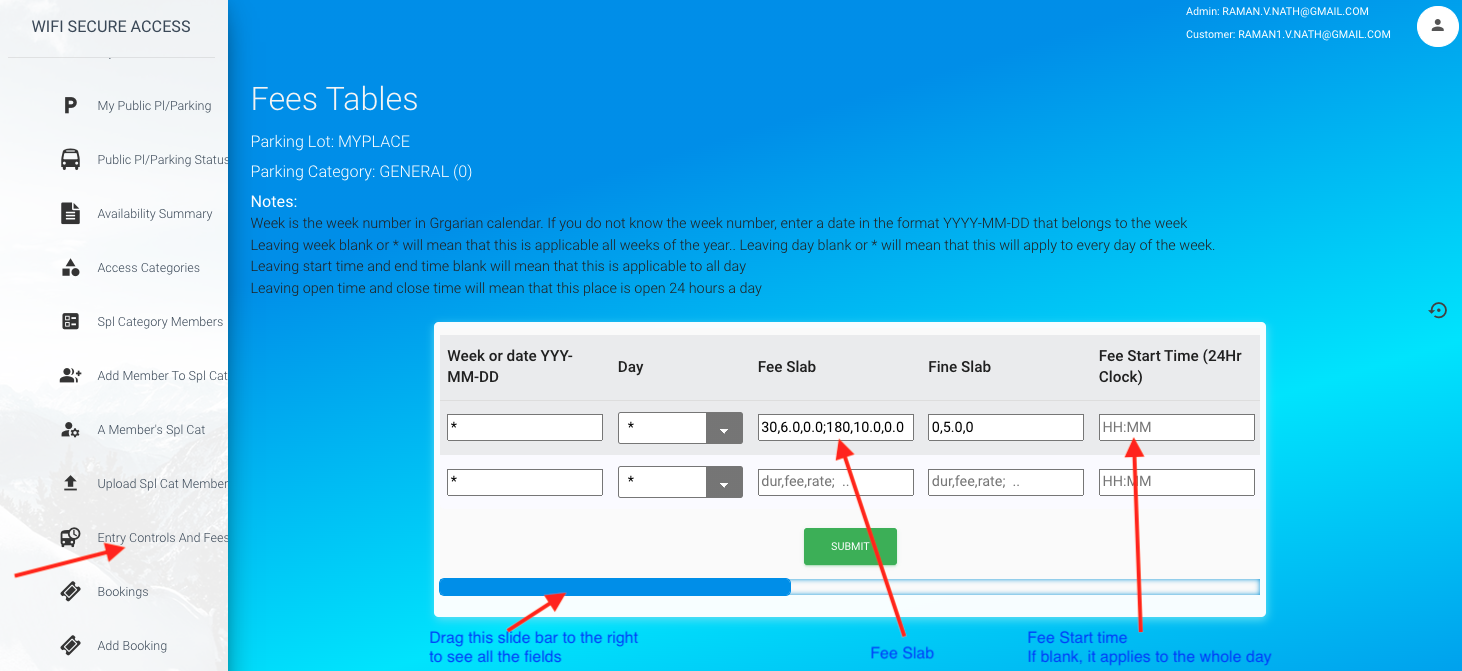
Check-in/Parking fee form presented in this page (Fig 152) has several fields. To see all the fields in this form, you may have to move the slider to the right. By default, you will see a separate row for each configured category. If not, you may have to add them. If no fee is configured for any category, it will be assumed that check-in/parking in that category is free and entry is allowed all the time of the day, every day of the year.
The following is the explanation of every field in this form. This will help configure fees and fines to meet your requirement.
Category: This is the checkin/parking category for which this tariff applies. Select one from the pulldown menu. You need to create separate fee slabs for each category.
Week and Day: 'Week' and 'Day' are the week number of the calendar year (Gregarian Week number) and day of the week respectively. By default these are set as *, indicating that the check-in/parking fee is the same any day of the week in every week of the year. However, if you want to set different fees for different days of the week, you can select the day for which this fee is applicable. Similarly, if you want to set different fee for different weeks in the year, you can enter the week number. If you do not know the week number corresponding to a date, just enter any date within that week. It will find its week number. Keep in mind that if you are setting a fee for, say, Monday of the week, and leave week as *, that fee is applicable for every Monday of every week. If so, you will have to set another fee for the other days of the week.
Fee Slab: This is the parking fee structure in slab format, with multiple sub-slabs separated by comma(;). This has a format as follows:
<duration in minutes from the start of parking >,<fee>, <fee increase as amount per minute>, <duration from the start>,<fee>,<fee increase rate per minute>; ...
If the fee_slab is left blank, it is assumed that the access is free.
Each sub-slab is separated by a comma(;). Each sub-slab has a duration (in minutes) and a fee for that duration, and a fee rate per minute, each separated by colon (,). The fee and rate are in decimal format. The currency is what is set for each public place/parking lot.
-
Examples:
0,2.0,0.0;30,4.0,1.0;300,6.0,2.0
This example has three slabs. The first one is 0,2.0,0.0. That means that the fee is 2.0 if the duration is 0 minute or more (but, below the next slab), and the fee rate is 0.0. That means that the fee does not increase wuth the duration of parking within this slab. The next slab is 30,4.0,1.0. This means that if the parking duration is 30 minutes or more (below the next slab), pfee is 4.0. It also increases at the rate of 1.0 per minute within this slab. The next slab is 300,6.0,2.0. This means that if the total parking duration is 300 minutes or more, fee is 6.0, and it increases at the rate of 2.0 per minute after 300 minutes.
So, with the above slabs, if someone parks for a duration of 60 minutes, fee will be 4.0 + (60 - 30) * 1.0 = 34.00. And, if anyone parks for 600 minutes, fee will be 6.0 + (600 - 300) * 2.0 = 606.00
Another Example:
30,6.0,0
This means that parking fee is 6.0 if the parking duration is 30 minutes or more. There is no fee if parking duration is less that 30 minutes.
If this premise has multiple fee start and fee end, or multiple opening and closing hours in a day, create separate entry for ech of those. You can add multiple entries for te same day. The only condition is that fee start and fee end of one entry cannot overlap with those of the other entries.
Note: In addition to these fees, if one is interested in adding any extra fee for using any gate, that can be addedd by setting extra fee for that device. This can be set by clicking Devices Admin → Device Station Prop. Select the device and in the form that opens, set extra fee for that device. In this form, there are some additional properties also that can be set. If this device is used in public transport, one can set a station name for this device. One can also assign a Zone name and a zone value. When a user travels from one zone to another zone, the computed fee using fee slab is multiplied by the difference between the zone values to get the actual fee.
Fine Slab: 'Fine Slab' is the fine charged, if one checks-in/parks more than the maximum check-in/park duration. This slab has the same format as 'Tariff Slab'
Note: Fine is comuted starting the maiximum allowed parking time till the the time when parking ended. Fee is computed for the duration from parking start to parking end.
Start Time and End Time: The 'Start Time' and 'End Time' are the start time and end time for the fee and fine. These are in 24 hour clock in the format hh:mm. Outside this time, it is assumed that there is no fee or fine. If you want to apply the fee for the entire 24 hours of the day, leave these two fields blank. If this premise has multiple fee or slabs within a day, create more entries into this table, one for each start/End time of fee and fine. This start time and end time are applicable to both Fee_Slab and Fine_slab. It is allowed to have fine slab even when fee slab is empty, and vice versa.
Max Checkin/Park Duration: 'Max Checkin/Park Duration' is the maximum duration allowed to be checked-in/parked in minutes. By default, it is 24 hours (1440 minutes). If anyone is occupying beyond maximum duration, the check-in/parking has to be either extended (if allowed) or fine will be applied.
Min Park/Book Duration: 'Min Park/Book duration' is the minimum time in minutes that one can park or book a seat/bay in this public place/parking lot. By default, it is 30 minutes. You can change it to anything.
Open Time and Close Time: 'Open Time' and 'Close Time' are the opening and closing time of this public place/parking lot. They must be entered in 24 hour clock in a format hh:mm. Outside this time, this premise is considered as closed. If you leave the 'Open Time' and 'Close Time' blank, it is assumed that this public place/parking lot is open all day. Fee as well as fine are will be considered as 0 outside the opening and closing hours of this premise.
Checkout Extendable: 'Checkout Extendable' can be either 'EXTENDABLE' or 'NOT EXTENDABLE'. If 'NOT EXTENDABLE' nobody will be allowed in when their check-in/parking expires. They will not be able to extend their check-in/parking. Fines will be applied if anybody occupies beyond maximum check-in/park duration.
If you have multiple opening and closing times within a day, enter separate row for each of those. For example, if this is used for entry control to cinema halls where there are multiple showing (multiple sessions) in a day. you enter each row of tariff table for each session. Opening and closing times of one session cannot overlap with another.
Once you have created this tariff table, you can see in the google map this tariff shown against your public place/parking lot. So, the public customers can know the check-in/parking fee of your public place/parking lot before they arrive at the public place/parking lot.
10 Enable/Disable Booking/Check-in/Parking in a Public Place or Parking Lot
Booking is disabled by default when a public place/parking lot is registered. You can enable booking in any public place/parking lot by clicking 'My Public Places and Parking Lots' under Public Place/Parking Lot Admin in the dashboard menu and selecting 'Allow Booking' to 'Yes'. This selection allows booking to all categories created within this public place/parking lot unless selectively disabled for each category.
However, you can selectively disable booking in any category during any specific period of the year. To do so, first click on 'My Bookings' under 'Public Place/Parking Lot Admin'. If you have registered more than one public place/parking lot, you will be prompted to select one. Once selected, you will be presented with a Table similar to Fig 153 showing all the current bookings in all categories in selected public places/parking lots.

If the booking is currently disabled in any category, you will see an entry with Status as NOT_BOOKABLE and the customer is ADMIN@WIFISECUREACCESS.COM. This entry will be seen for each parking category for which booking is disabled. That entry also has a start date and end date. It is between those dates, the booking is disabled. If you want booking to be enabled throughout the year, delete this entry by checking the Delete box and pressing Submit button. Once you have deleted this entry, public customers will be able to book in that category in that public place/parking lot.
Once booking is enabled, public customers will see a link 'Make a Booking' in the pop up window against your public place/parking lot in the google map. You can check this by clicking 'Public Pl/Parking Lots Map' in the Public Place and Parking Lot Admin. Click on the marker on your public place/parking lot. In the pop up window, you will see a link to “Make a booking”.
When the customer arrives at the public place/parking lot within 15 minutes of his booking, and when he scans the QRCode or NFC tag, the system will check and verify his booking and allow him to check-in/park against this booking.
This page also helps disable booking in any category during any specific duration of the year. You can disable booking between any time of the year. To do so, click on 'Add Booking' in the 'Public Place/Parking Lot Admin'. If you own more than one public place/parking lot, system will prompt you to select a public place/parking lot. Then, you will be presented with a form similar to Fig 154.
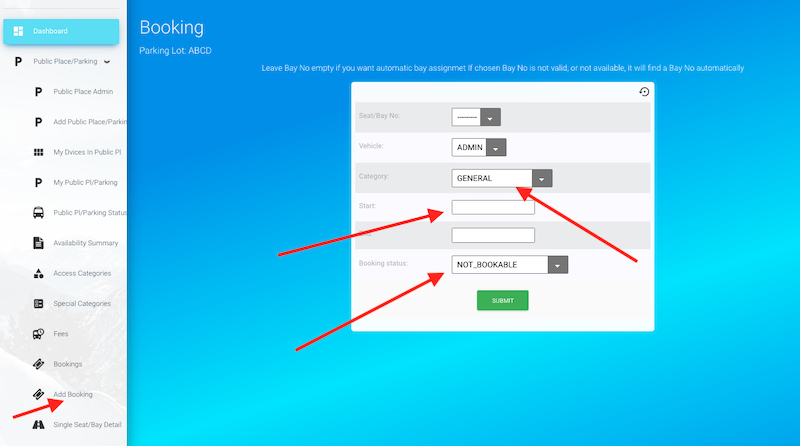
Select the category and enter the start date and end date between which you want to disable booking. These dates must be entered in a format 'yyyy-mm-dd hh:mm'. Then, in 'Booking Status', select 'NO_BOOKING' and press Submit.
Note: You can also disable check-in/parking in any public place/parking lot between any dates, if you want, by selecting 'NO CHECK-IN/NO-PARKING' in this form.
11 Check Status and Use Records of Your Public Place or Parking Lots
You can check the current status of your public place/parking lots, as well as the previous check-in/parking records. On the “Public Place/Parking lots Admin” page, you will see the tabs: “Checkin/Parking Status”, “Single Bay Detail”, “Lot availability summary”, “Checkin/Parking records”. You can click on any of these to get the current status as well as previous records of your public place/parking lots. Note: “Single Bay Detail” is for those public places/parking lots where each seat/bay has a Smart device.
For administrative reasons, if the owner of the public place/parking lot finds it necessary, he can forcefully checkout a person or /unpark a vehicle that occupies in any of the public place/parking lot that he owns. To do that, click 'CheckOut/Unpark a Vehicle' in the 'Public Place/Parking Lot Admin'
The system keeps checkin/parking records only for 30 days. The owner of the Public place/parking lot can see these records by clicking 'Use/parking records' under 'Public Place/Parking Lot Admin' in the dashboard menu. These records can also be downloaded to a local computer for any future analysis. to download, click on 'Download Use/Parking records' under 'Public Place/Parking Lot Admin' in the dashboard menu. If the owner of the public place/parking lot wants to integrate downloading within any of their application programs, they can do so by writing a small segment of a program. This is explained in section 9.4 of this documentation.
12 Integrating this system with your own booking platform
WifiSecureAccess access control system has a booking platform of its own. Customers (public) can book any seat or bay of this public place as per the steps described in section 5.13 of this documentation. However, if you are currently using a booking platforms for the customers to book a bay or a seat in this public place or parking lot, you can continue to use that by integrating this to your booking platform. Integration is simple, if you can add an HTTPS POST call within your platform whenever customer makes a booking using your platform. That will then populate the booking information in Bhadre system so that the customer will use that booking to checki in when he scans the QRCode or NFC tag at the door/gate. The format of the HTTPS POST call that your platform should make is as follows:
POST HTTP/1.1
Host: wifisecureaccess.com/access/lotAddBookingJson/
Content-Type: application/json
data = { "lot_owneremail": lot_owner_email, "password": lot_owner_password, "facility_name": facility_name, "customer_email": customer_email, "parking_category": access_category, "booking_start": booking_start, "Booking_end": booking_end, "vehicle_reg_no": vehicle_reg_no, "seat_bay_no": seat_bay_no, }
--where
Refer to section 8.4 of this documenmtation for an example of such a call in python. You can insert that call within your platform any time when customer makes a booking using your platform.
Similarly, a booking can also be deleted with a similar call. Whenever customer deletes a booking, insert an HTTP POST call within your platform to delete that booking from Bhadre. The format of that call is as follows:
POST HTTP/1.1
Host: wifisecureaccess.com/access/lotDeleteBookingJson/
Content-Type: application/json
data = { "lot_owneremail": lot_owner_email, "password": lot_owner_password, "facility_name": facility_name, "customer_email": customer_email, "booking_start": booking_start, "Booking_end": booking_end, "vehicle_reg_no": vehicle_reg_no,}
--where
Refer to section 8.5 of this documenmtation for an example of such a call in python. You can insert that call within your platform any time when customer deletes a booking using your platform.
If customer modifies a booking, make an https call to delete the current one, and then make another https call to make a new booking.
13 How to create a Stripe account for Receiving Fees from customers
If you are charging fees, you have to create a an account with Stripe.com and connect that account with wifisecureaccess.com. First, login to Stripe.com and open an account. Once an account is opened, go to https://wifisecureaccess.com. Click “Public Place/Parking lots Admin” on the Dashboard. If you have registered public places or parking lots with Bhadre and if you have not yet connected your stripe account with wifisecureaccess.com, you will see a button “Create/Connect Stripe account” at the bottom of this page as shown in Fig 155.
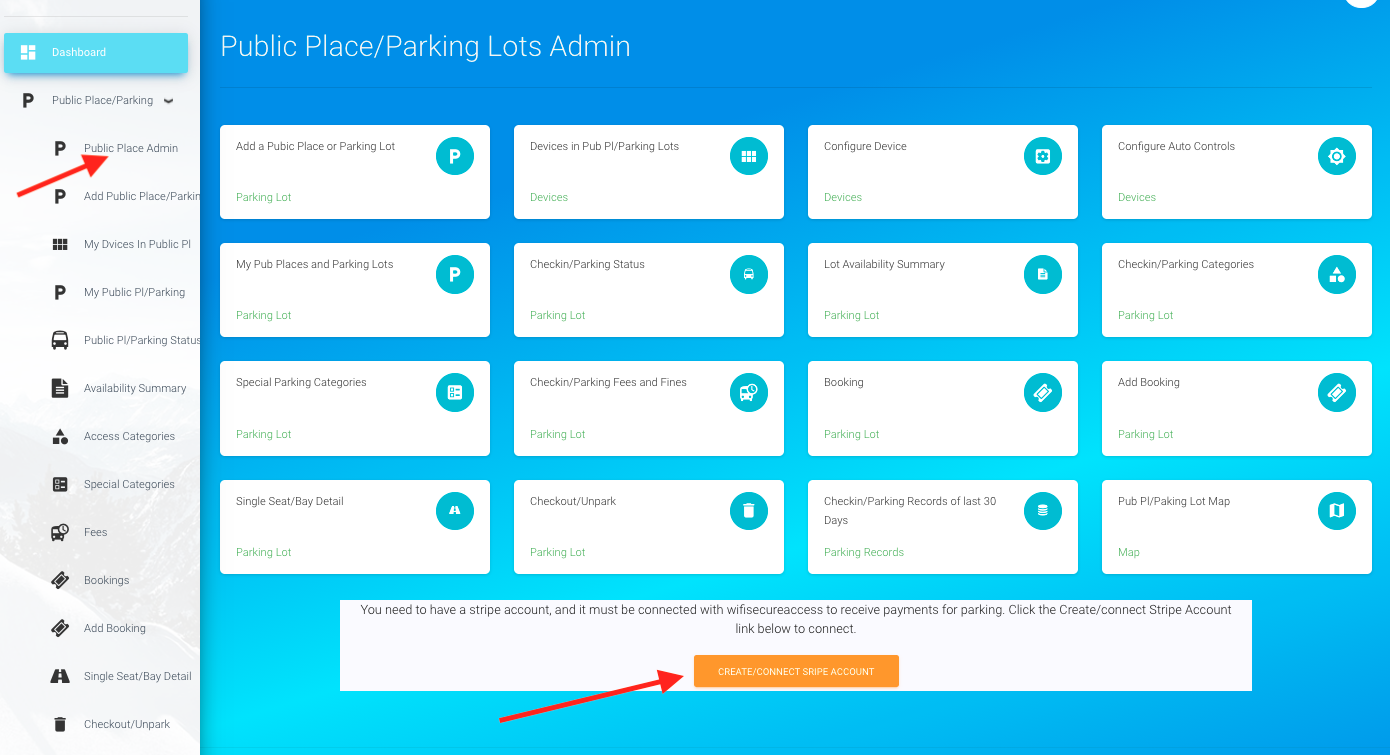
Click on that link. That will take you to stripe.com. Follow the prompts. Once you have entered all the information on that page and submit, it will connect your steipe account with wifisecureaccess.com and take you back to “Public Place/Parking Lots Admin” page of wifisecureaccess.com. At this time, if your account has been successfully connected to wifisecureaccess.com, the link at the bottom will show “Disconnect Your Stripe Account”. You can disconnect your stripe account from wifisecureaccess.com by clicking this link. But, please keep in mind that if your account is not successfully connected, entry/parking fees will not be collected transferred to your stripe account.
14 Monitoring and Managing Check-in and Parking by public customers
When Public places or parking lots are in the system, everyone can see a button 'My Checkin/Parking Admin' in the Dashboard. This is a link to the public (customers and Motorists who want to use these places)) to manage their checkin or parking. They can also locate a public place or parking lot in a city and to see and manage their parking. If they click on that link, they will see a page similar to Fig 156, if thee are registered public places or parking lots in the system. Or, if you have already registered a vehicle, you may see a page similart to Fig 159 below.
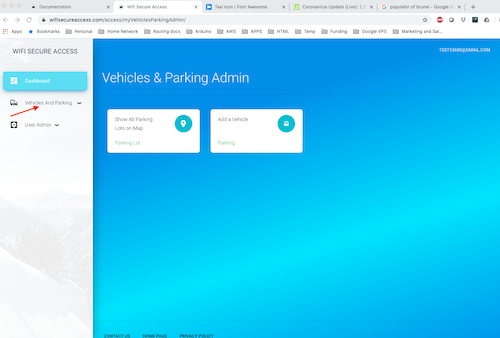
If you are seeing a page as shown above with a tab 'Add Vehicle', click on 'Add a Vehicle'. That will show a page similar to Fig 157.
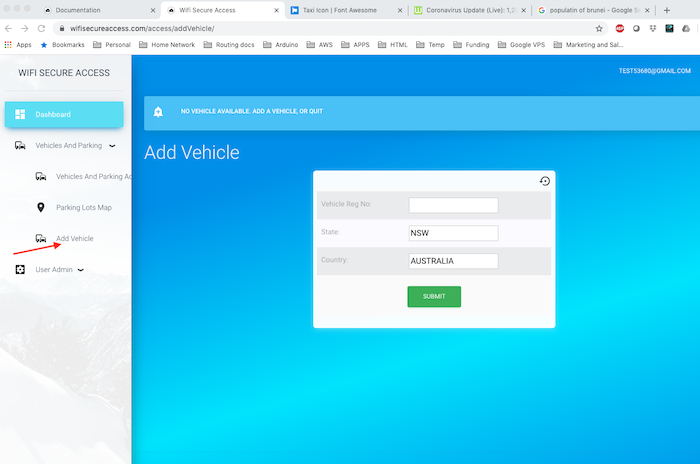
In this form, State and Country are the state and country where this vehicle is registered with the Government Authority. For example, if the vehicle is registered in California in USA, enter CA for State and USA for Country. Press Submit after entering these information.
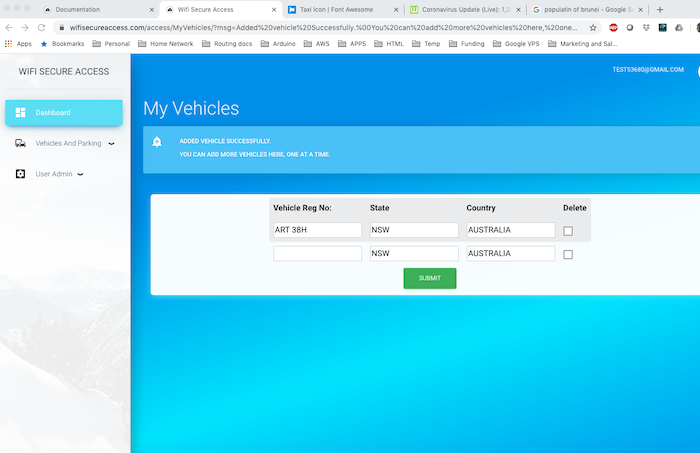
Once you press Submit, it will register your vehicle with Bhadre against your account and display a page similar to Fig 158 showing all your registered vehicles. In this page, you can add any additional vehicles or delete any registered vehicle.
Once you have registered a vehicle, you will see a page similar to the following when you click on 'My Checkin/Parking' under Dashboard.
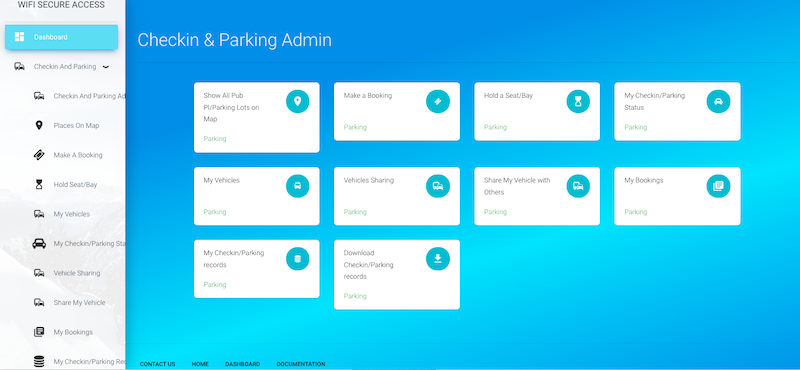
There are several links on this page that will help the public to manage their checkin and parking.. The following are some brief explanations of the links:
-
1. 'Show All Public Pl/Parking Lots on Map' : Click this button to see all registered public places and parking lots in the system on a Google map. They will see either a green marker or a red marker at the public places and parking lots. The marker is green if there are spaces available in that public place or parking lot and it is red when the place is full at this time. Click on this marker to see further details of this public place or parking lot. They will see a pop up window. They will see its name, available access/parking categories, available spaces in each category as well as access/parking fee in each category at this time. If the owner of the public place/parking lot has provided a link to the url of this place, they can go to their site by clicking the name of that public place or parking lot. Also, if the owner of this place has enabled booking, they will see a link to "Make a Booking'. And, if the owner has set a hold time, they will see a link to 'Hold a space'. If yes, they can click that link to hold it. Then follow the prompts. If successful, they can hold a space space in that public place or parking lot while driving to that place. Note: This feature of holding a spot is available only if the place has smart devices at every seat/bay.
2. 'My Vehicles': Clicking this link will take them to a page showing all their registered vehicles. They can add more vehicles or delete any registered vehicles on this page.
3. 'My Checkin/Parking Status': If they click this tab, it will display the checkin/parking status of their checkin status or parking status of their currently parked vehicles. If they have checked into a public place or parked a vehicle in any parking lot, this will display the duration of checkin/parking, time when it expires, access/parking charge accumulated so far, and a link to extending checkin/parking, if extension of parking is allowed by the owner of that place.
4. 'My Bookings': Clicking this tab will take them to a page showing all their current bookings. They will be able to make any modification of their booking in this page, if allowed.
5. 'Share My Vehicle': This tab helps you to share their vehicle with friends and family. If they share, those whom they share with can use this vehicle to park in any of the parking lot.
6. 'Vehicles Sharing': Clicking this tab will display all the vehicles that are shared between them and others.
7. 'My Checkin/Parking records': This tab helps them to see all their checkin/parking records in the last 30 days. The system keeps record of every public customer for 30 days, and and they can see where and when they checked in or parked, how long they parked and what access/parking fee and fine they paid in the past 30 days.
We recommend clicking these links and get a feel of what all public customers can do.
Checkin/Parking: In order to checkin or park, public customer needs to scan the QRCode or NFC Tag at the entry of a public place or parking lot using the WifiSecureAccess App on their smart phone. Open the app in their smart phone, press 'Scan QRCode' and scan the QR Code placed at the entry or exit door/gate of the place. If they have used NFC Tags instead of QR Codes, press SCAN NFC TAG. If they have not yet registered with wifisecureaccess.com, they will be promipted to register. If this is a public access place or parking lot with an access fee, they may be prompted to register their credit card. When scanning at the exit gate, access/parking fee will be computed and will be charged to their credit card. The system will automatically transfer the parking fee (minus Stripe fee) to the Stripe account of the owner of that public place or parking lot. If they have not used your credit card yet for checkin/parking with wifisecureaccess.com, the system will prompt them at the entry to register it and will charge $1 at the entry while registering. Once registered, stripe.com will remember their credit card details and, thereafter, the system may not request them to enter credit card details again for future checkin/parking in any public places or parking lots managed by Bhadre.